Setting Up#
We’re really happy you’d like to learn how to contribute towards Ivy 🙂
This page explains the main steps to get started!
Forking and cloning the repo#
You will first need to fork the Ivy repository from the repository page here repo by using the fork button on the top right. This creates a copy of the Ivy repository in your GitHub account.
Clone your forked repo to your local machine.
Depending on your preferred mode of cloning, any of the below should work:
git clone --recurse-submodules git@github.com:YOUR_USERNAME/ivy.git
git clone --recurse-submodules https://github.com/YOUR_USERNAME/ivy.git
gh repo clone YOUR_USERNAME/ivy your_folder -- --recurse-submodules
Then enter into your cloned ivy folder, for example cd ~/ivy and add Ivy original repository as upstream, to easily sync with the latest changes.
git remote add upstream https://github.com/unifyai/ivy.git
Pre-Commit#
Our development team also makes use of the pre-commit PyPI package.
Check out their page for more details.
In a nutshell, this enables us to add pre-commit hooks which check for lint errors before a commit is accepted, and then also (in most cases) automatically make the necessary fixes. If the lint tests fail when a commit is attempted, then the commit will not succeed, and the problematic lines are printed to the terminal. Fixes are then applied automatically where possible. To proceed with the commit, the modified files must be re-added using git, and the commit will then succeed on the next attempt.
In order to install and properly set up pre-commit, these steps should be followed:
Run
python3 -m pip install pre-commitEnter into your cloned ivy folder, for example
cd ~/ivyRun
pre-commit install
That’s it! Now when you make a commit, the pre-commit hooks will all be run correctly, as explained above.
For questions, please reach out on discord in the pre-commit thread!
PyCharm#
Pycharm is the main IDE of choice for our development team. However, you are of course welcome to use whatever Integrated Development Environment (IDE) you’re most familiar with. If you do decide to use PyCharm, you should make sure to check whether you are eligible for a free student license. Many people seem to miss this option, so we thought we would add an explicit reminder here in the setting up guide!
Important Points
Once you don’t have a student account, the student license will expire and you won’t be able to access PyCharm Professional.
To continue using PyCharm Professional, you can use the trial version making a jetbrains account but that would be only valid for 1 month.
After the trial expires you have to buy the paid version of PyCharm Professional.
For questions, please reach out on discord in the pycharm thread!
Virtual environments - No Docker#
Due to the rapid pace of updates in Ivy, it is strongly suggested for developers to use the latest ivy package from GitHub source, as explained below. This is to ensure the contributors’ code and examples are as aligned and in accordance with the latest as possible. The stable version of Ivy from PyPI maybe used for personal projects and experiments but avoided in development, for now. If you want to use the stable version, you are welcome to use the docker container or pip install ivy.
Below is a guide to creating your own virtual environment. The benefit of creating a python environment is the ability to install certain packages for a project and then other packages (perhaps different versions) in a new environment for another project. This makes it very easy to keep track of installed packages and their versions.
Below is a guide for setting up a developing environment for Ivy.
You can either use miniconda or venv:
Using miniconda#
Install miniconda
Open conda terminal
Create the environment by running the command (
ivy_devis the name of the environment)conda create --name ivy_dev python=3.10.0
Activate the environment by:
conda activate ivy_dev
Now install the ivy package for development by running the command below:
pip install -e .
Setup the interpreter by:
Pycharm
Going to settings -> project -> Python Interpreter
Clicking add interpreter (currently by clicking the ⚙ icon on the right side) which should open a new window.
Choosing “conda environment” from the left panel. Choose the existing environment and select the drop down and you should find the path python in the environment.
VSCode
Go to the command palette (Ctrl+Shift+P) or (⌘+shift+p) for Mac and type “Python: Select Interpreter” and select the environment you created.
If you don’t find a path to your created python environment, you can run
where pythonin the conda command line while the environment is activate and it should give the path which can be added manually.Installing the development dependencies.
On Linux, Windows, or Intel Mac, you will need to use the optional.txt requirements file. To install dependencies.
pip install -r requirements/optional.txt
On M1 Mac, you will need to use the optional_apple_silicon_1 and optional_apple_silicon_2 requirements files. To install dependencies.
pip install -r requirements/optional_apple_silicon_1.txt
pip install -r requirements/optional_apple_silicon_2.txt
Installing array API testing dependencies.
To make sure you have all the packages for running tests available change the directory to
ivy/ivy_tests/array_api_testing/test_array_apiin your cloned fork using thecdcommand and run the command below (while yourivy_devenvironment is active):pip install -r requirements.txt
This will install packages required for running the tests in Array API suite.
Using venv#
This is a builtin package and doesn’t require explicit installation.
Open your terminal/cmd in the directory where you would like to have the folder with the environment files.
Create the environment by running the command below with a new environment name. We named it
ivy_devlike above.python -m venv ivy_dev
Try
python3ifpythondoesn’t work.Activate the created environment by running (in the same working directory as the environment folder):
ivy_dev\Scripts\activate.bat
(on Windows)
OR
source ivy_dev/bin/activate
(on Mac/Linux)
Now install the ivy package for development by running the command below:
pip install -e .
Setup the interpreter by:
Pycharm
Going to settings -> project -> Python Interpreter
Clicking add interpreter (currently by clicking the ⚙ icon on the right side) which should open a new window.
Choosing “virtualenv environment” from the left panel. Choose an existing environment and add the path to python. The path to python can be found by
where pythonon Windows andwhich pythonin Linux/Mac OS.
Note: You may tick “Make available to all projects” so you will be able to find the interpreter from the conda/venv environment in any future projects.
VSCode
Go to the command palette (Ctrl+Shift+P) or (⌘+shift+p) for Mac and type Python: Select Interpreter and select the environment you created.
Installing the development dependencies.
On Linux, Windows, or Intel Mac, you will need to use the optional.txt requirements file. To install dependencies.
pip install -r requirements/optional.txt
Note: In case you are using Ubuntu 22.04, PaddlePaddle won’t install properly. You have to download it from the source.
wget http://nz2.archive.ubuntu.com/ubuntu/pool/main/o/openssl/libssl1.1_1.1.1f-1ubuntu2.20_amd64.deb
sudo dpkg -i libssl1.1_1.1.1f-1ubuntu2.20_amd64.deb
PS: If the link gets expired at some point in the future, check http://nz2.archive.ubuntu.com/ubuntu/pool/main/o/openssl/?C=M;O=D for a valid one.
On M1 Mac, you will need to use the optional_apple_silicon_1 and optional_apple_silicon_2 requirements files. To install dependencies.
pip install -r requirements/optional_apple_silicon_1.txt
pip install -r requirements/optional_apple_silicon_2.txt
Installing array API testing dependencies.
To make sure you have all the packages for running tests available change the directory to
ivy/ivy_tests/array_api_testing/test_array_apiin your cloned fork using thecdcommand and run the command below (while yourivy_devenvironment is active):pip install -r requirements.txt
This will install packages required for running the tests in the Array API suite.
Here are the visual guides for setting up a virtualenv environment OR conda environment in pycharm from JetBrains. For VSCode, you can follow the instructions virtual environments.
Installing Ivy from source
You can also install Ivy from source if you want to take advantage of the latest changes, but we can’t ensure everything will work as expected. All the steps will remain the same for miniconda and venv as described above, only the command for point 4 for venv and point 5 for miniconda will change, everything else will remain the same. You have to run the following instead:
pip install git+https://github.com/unifyai/ivy.git
Docker Interpreter with PyCharm#
Setting up and using the same remote python interpreter provided as a docker container helps make sure we are all using the same packages (same environment) and helps to mitigate any potential version conflicts etc.
In addition, it makes it possible to use modules not yet available for a particular operating system, such as jaxlib on a Windows machine.
Below, we provide instructions for setting up a docker interpreter for Pycharm, which, as mentioned above, is the IDE of choice for our development team:
Windows#
Install Docker Desktop
Install WSL 2. For most, it will only require running the command
wsl --installin powershell admin mode. Visit the link if it doesn’t.Install Pycharm Professional Version, make sure to only install the Professional version of PyCharm, not the Community version.
Open pycharm with your cloned Ivy repository. Add the remote python interpreter by:
Going to the settings -> Build, Execution, Deployment -> Docker Click the “+” on the top left and it should add a docker connection.
Going to settings -> project -> Python Interpreter
Clicking add interpreter (currently by clicking the ⚙ icon on the right side) which should open a new small drop down menu. Select “On Docker…”. A window will open which will have three steps.
It will ask to create a new Docker target, at this step you have to select the following:
Docker image -> Docker
Image -> Pull
Image tag -> unifyai/ivy:latest
Select “Next”
The image will start pulling. It will take a respectable amount of time to complete. Once you see the “Introspection Completed” message, select “Next”.
Another window will appear, at this step select the following:
In the left panel select “System Interpreter”.
For Interpreter, select the default option which will be “/usr/bin/python3” the select “Create”.
Opening “Edit Run/Debug configurations” dialog -> “Edit Configurations…” and making sure that “Working directory” is empty in case of getting the “Can’t run process: the working directory ‘ivy’ is invalid, it needs to be an absolute path” error.
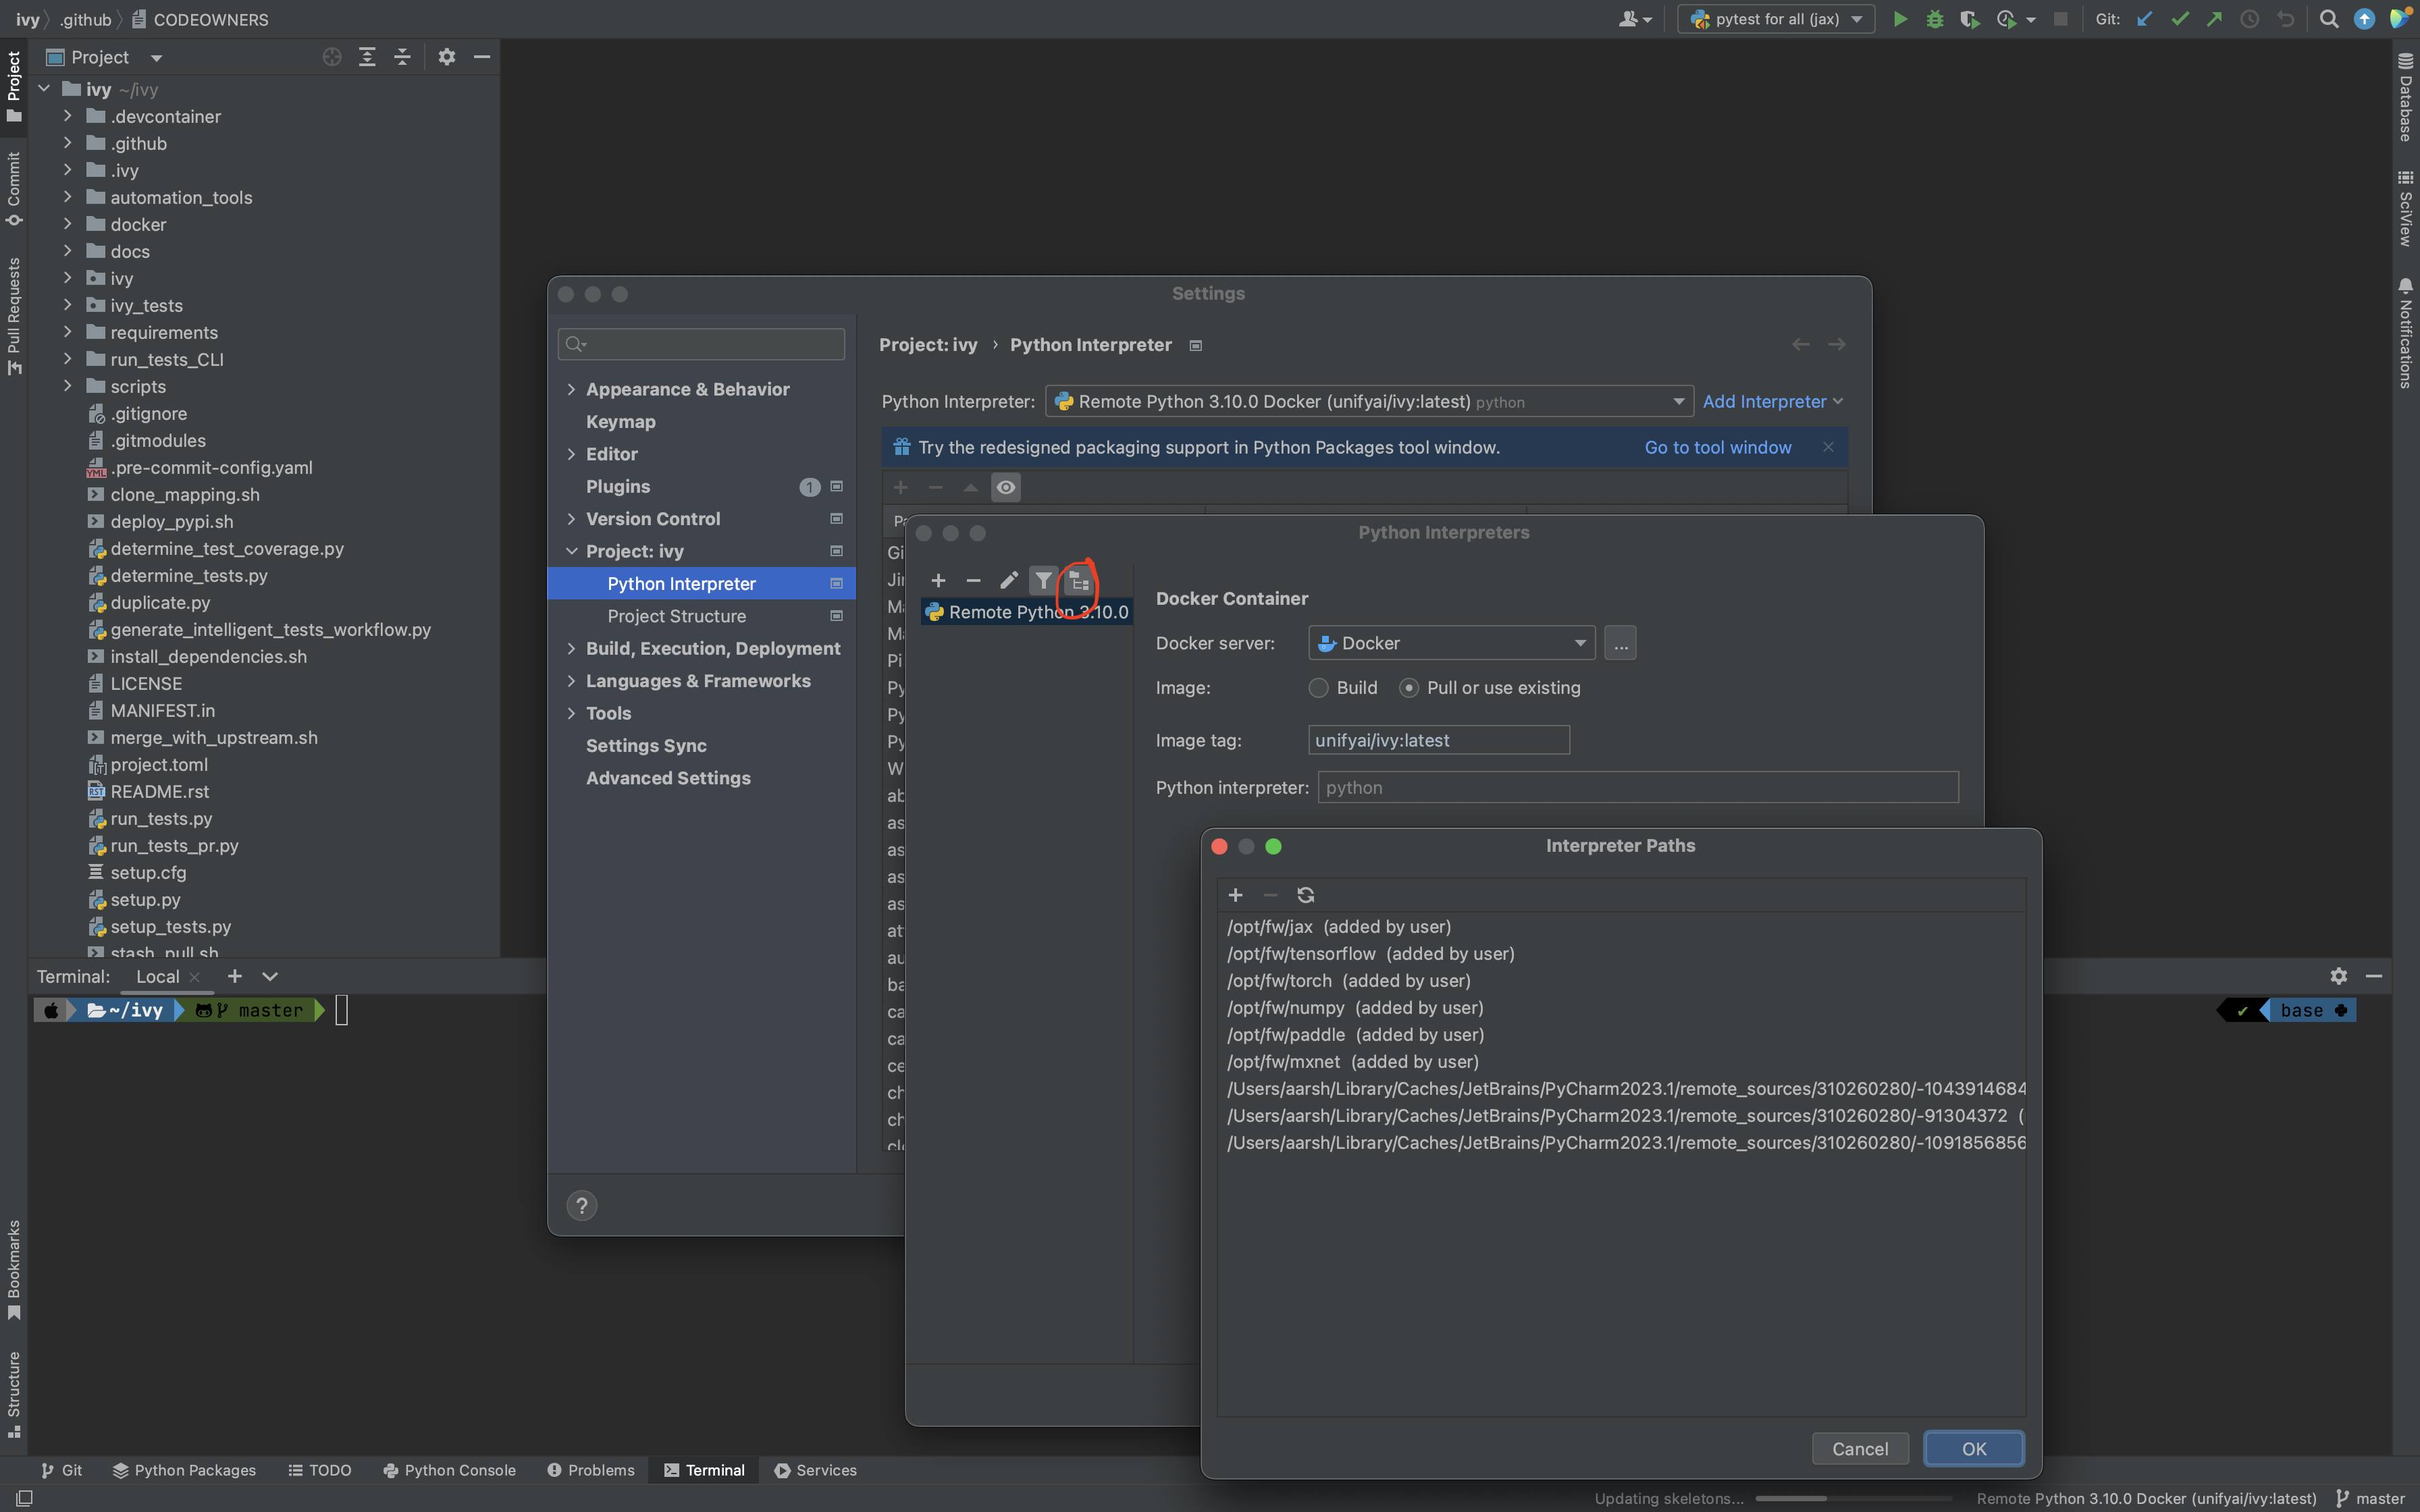
Everyone using PyCharm with the latest docker image and facing issues after setting up everything. All you need to do is add the paths here once, and then go to
File--> Save allfor this configuration to persist. Just as shown in the image below, The paths would be:/opt/fw/numpy /opt/fw/jax /opt/fw/tensorflow /opt/fw/torch /opt/fw/paddle /opt/fw/mxnet
Once these steps are finished, your interpreter should be set up correctly! If Docker’s latest version causes an error, try using an earlier version by visiting Docker release note. For some Windows users, it might be necessary to enable virtualisation from the BIOS setup.
Video
MacOS#
Install Docker Desktop.
Get the latest Docker Image for Ivy by:
Running Docker desktop.
Opening the terminal, and running the command:
docker pull unifyai/ivy:latest
Install Pycharm Professional Version
Open pycharm with your cloned Ivy repository. Add the remote python interpreter by:
Going to the settings -> Build, Execution, Deployment -> Docker. Click the “+” on the top left and it should add a docker connection.
Going to settings -> project -> Python Interpreter
Clicking add interpreter (currently by clicking the ⚙ icon on the right side) which should open a new window.
Choosing “On Docker” from the dropdown menu.
Choosing “Docker” from the “Docker server” dropdown menu, choosing “Pull” if you want to use a remote interpreter, and using
unifyai/ivy:latestas the image tag.If you don’t want to use a remote interpreter, choose “Build” and use the suitable Dockerfile; then choosing
docker/Dockerfileto be the Dockerfile.Clicking next and navigating to the system interpreter tab from the menu on the left.
Choosing the built interpreter from the dropdown menu.
Once these steps are finished, your interpreter should be set up correctly! If Docker’s latest version causes an error, try using an earlier version by visiting Docker release note.
Important Note
When setting up on an M1 Mac, you would have to update the Dockerfile to install libraries from requirements/optional_apple_silicon_1.txt and requirements/optional_apple_silicon_2.txt instead of requirements/optional.txt.
Video
Ubuntu#
Install Docker by running the commands below one by one in the Linux terminal. You may visit Docker Ubuntu Installation Page for the details.
sudo apt-get update
sudo apt-get install \
ca-certificates \
curl \
gnupg \
lsb-release
sudo mkdir -p /etc/apt/keyrings
curl -fsSL https://download.docker.com/linux/ubuntu/gpg | sudo gpg --dearmor -o /etc/apt/keyrings/docker.gpg
echo \
"deb [arch=$(dpkg --print-architecture) signed-by=/etc/apt/keyrings/docker.gpg] https://download.docker.com/linux/ubuntu \
$(lsb_release -cs) stable" | sudo tee /etc/apt/sources.list.d/docker.list > /dev/null
sudo apt-get update
sudo apt-get install docker-ce docker-ce-cli containerd.io docker-compose-plugin
Get the latest Docker Image for Ivy by:
Opening terminal and running
systemctl start dockerRunning the command:
docker pull unifyai/ivy:latest
Note: If you get permission related errors please visit the simple steps at Linux post-installation page.
Install Pycharm Professional Version. You may use Ubuntu Software for this.
Open pycharm with your cloned Ivy repository. Add the remote python interpreter by:
Going to the settings -> Build, Execution, Deployment -> Docker. Click the “+” on the top left and it should add a docker connection.
Going to settings -> project -> Python Interpreter
Clicking add interpreter (currently by clicking the ⚙ icon on the right side) which should open a new window.
Choosing “Docker” from the left panel. Type python3 (with the number) in python interpreter path and press ok.
Docker Connection not Successful
This is a common error which you might face. If you are not successfully able to connect docker with Pycharm(point 4a) and your docker is also running, the issue is that you are not able to use your docker socket. So, executing the below two commands should solve this.
sudo chmod a+rwx /var/run/docker.sock
sudo chmod a+rwx /var/run/docker.pid
For questions, please reach out on discord in the docker thread!
Video
Setting Up Testing in PyCharm#
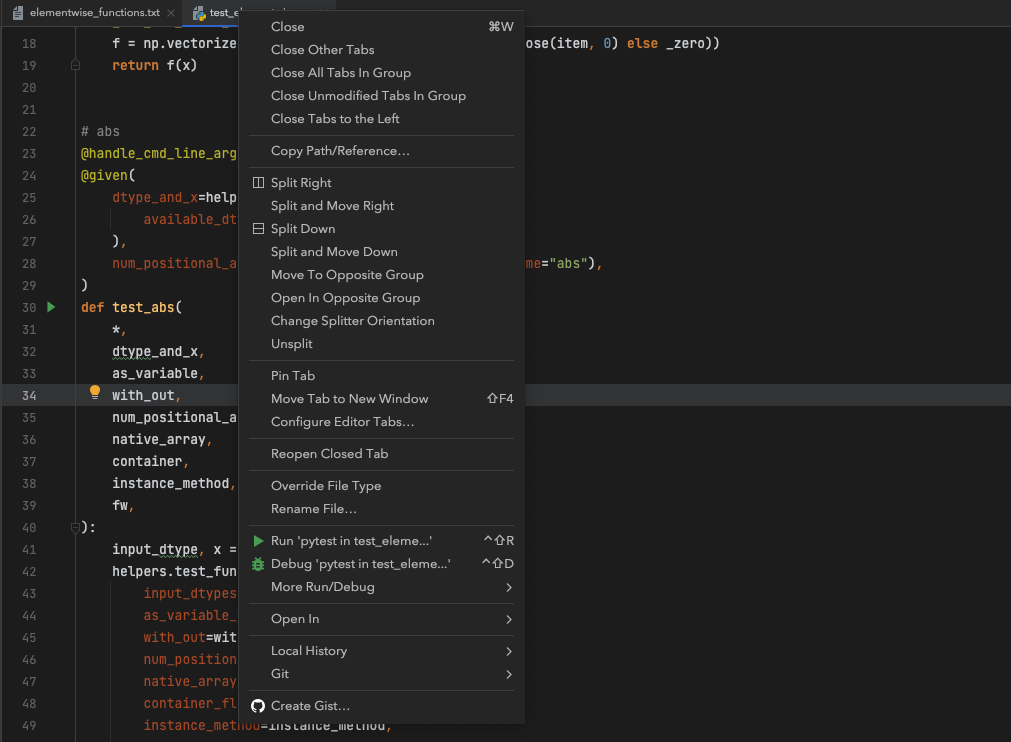
There are a couple of options to choose from when running ivy tests in PyCharm. To run a single unit test, e.g. test_abs, you can avail of the context menu in the PyCharm code editor by pressing the green ▶️ symbol which appears to the left of def test_abs(.
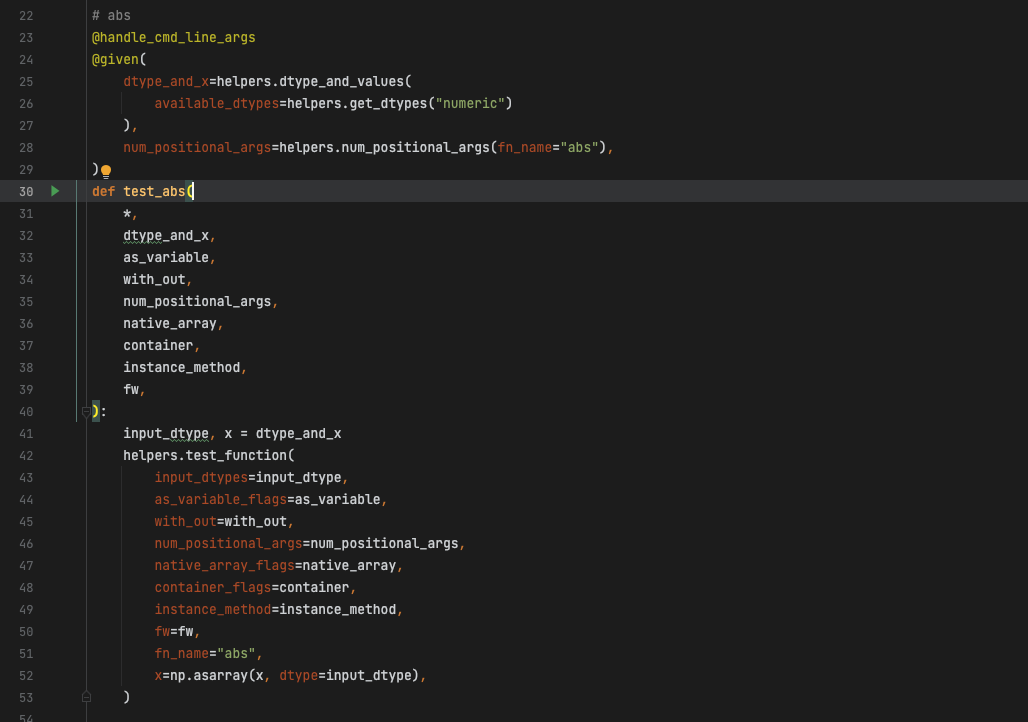
You can then click ‘Run pytest for…’ or ‘Debug pytest for…’.
Keyboard shortcuts for running the rest are displayed also.
These screenshots are from a Mac, hence the shortcut for running a test is ctrl - shift - R.
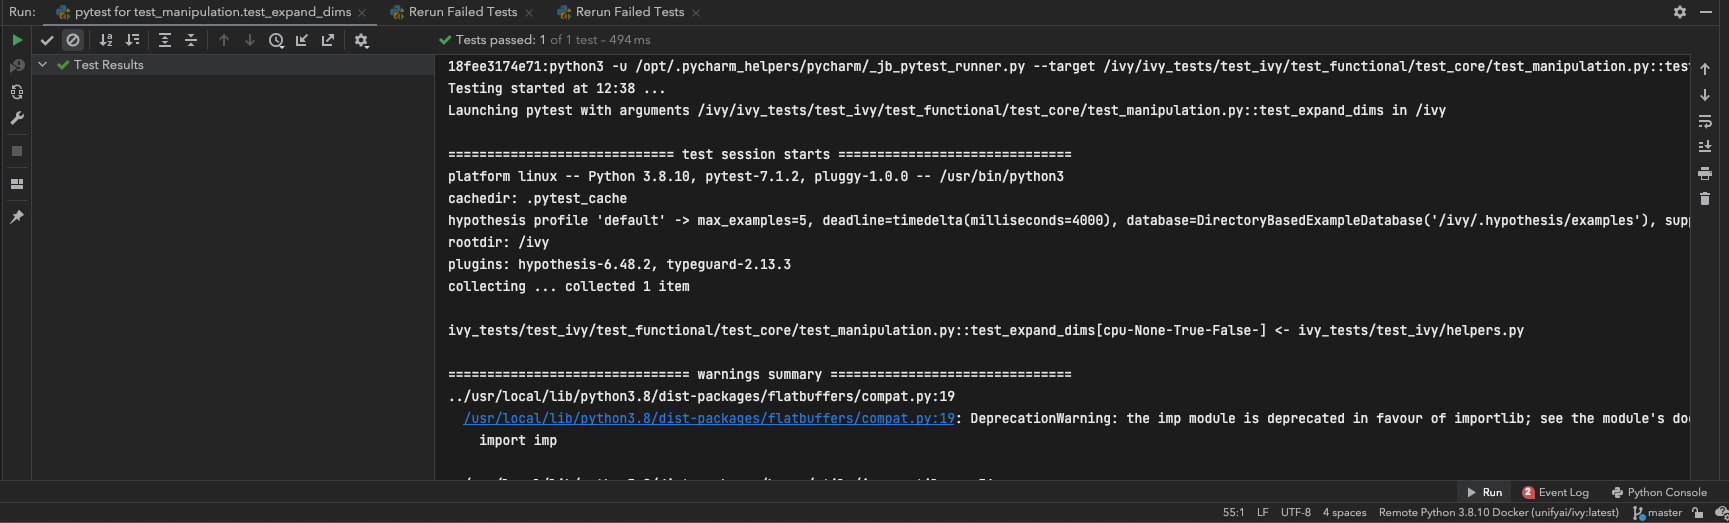
The test run should pop up in a window at the bottom of the screen (or elsewhere, depending on your settings).
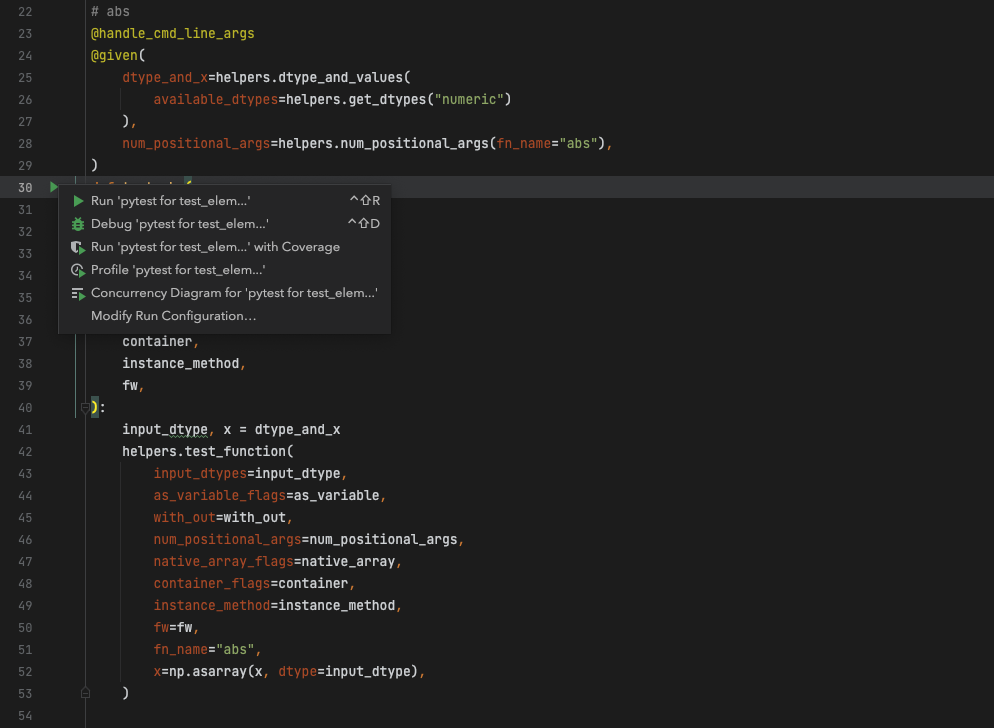
To run all the tests in a file, press ctrl - right click (on Mac) on the test_elementwise.py open tab.
A menu will appear in which you can find ‘Run pytest in test_elementwise.py…’
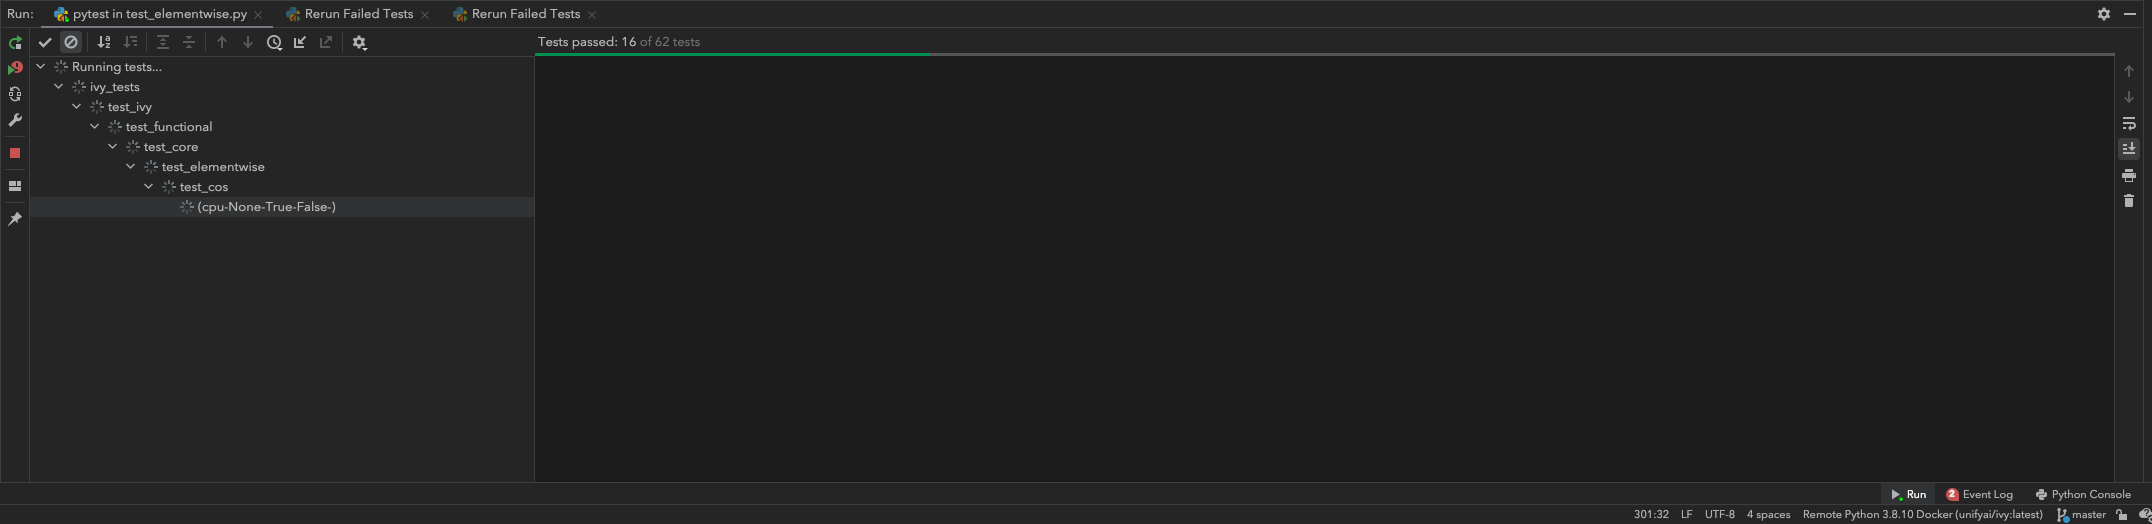
Click this and you should see a progress bar of all the tests running in the file.
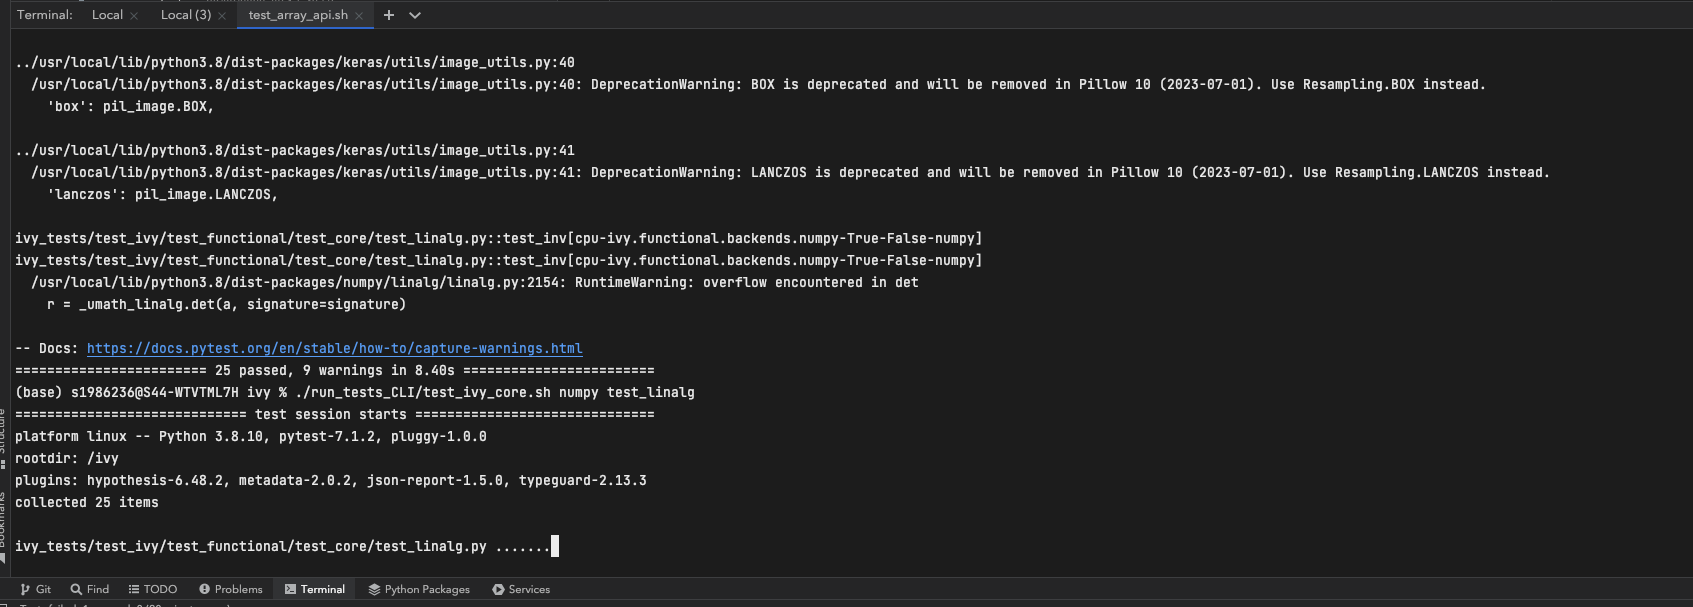
It is also possible to run the entire set of ivy tests or the array api test suite using pre-written shell scripts that can be run from the ‘Terminal’ tab in PyCharm. There are a number of such shell scripts in ivy/scripts:
scripts/setup_tests/run_ivy_core_test.py
scripts/setup_tests/run_ivy_nn_test.py
scripts/setup_tests/run_ivy_stateful_test.py
scripts/shell/run_tests.sh
scripts/shell/test_array_api.sh
scripts/test_dependencies.py
scripts/shell/test_dependencies.sh
scripts/shell/test_ivy_core.sh
scripts/shell/test_ivy_nn.sh
scripts/shell/test_ivy_stateful.sh
For Unix-based systems (Linux and macOS):
scripts/shell/run_tests.shis run by typing./scripts/shell/run_tests.shin the/ivydirectory. This runs all tests inivy/ivy_tests.scripts/shell/test_array_api.shis run by typing./scripts/shell/test_array_api.sh [backend] test_[submodule]. This runs all array-api tests for a certain submodule in a certain backend.scripts/shell/test_ivy_core.shis run by typing./scripts/shell/test_ivy_core.sh [backend] test_[submodule]in the ivy directory. This runs all ivy tests for a certain submodule in a certain backend intest_ivy/test_functional/test_core.scripts/shell/test_ivy_nn.sh,scripts/shell/test_ivy_stateful.share run in a similar manner toscripts/shell/test_ivy_core.sh. Make sure to check the submodule names in the source code before running.
For Windows users:
For Windows users, you may need to specify that the shell scripts should be run by sh, which comes with Git. In the Terminal, prepend sh to the script commands like so:
To run
scripts/shell/run_tests.shon Windows, typesh ./scripts/shell/run_tests.shin the/ivydirectory. This runs all tests inivy/ivy_tests.To run
scripts/shell/test_array_api.shon Windows, typesh ./scripts/shell/test_array_api.sh [backend] test_[submodule]. This runs all array-api tests for a certain submodule in a certain backend.To run
scripts/shell/test_ivy_core.shon Windows, typesh ./scripts/shell/test_ivy_core.sh [backend] test_[submodule]in the ivy directory. This runs all ivy tests for a certain submodule in a certain backend intest_ivy/test_functional/test_core.scripts/shell/test_ivy_nn.sh,scripts/shell/test_ivy_stateful.share run in a similar manner toscripts/shell/test_ivy_core.shon Windows. Make sure to check the submodule names in the source code before running.
The above instructions for running tests on Windows assume that you have installed Git and have access to the Git Bash terminal. If you do not have Git Bash, you can download it from the official Git website.
If you wish to run tests of all submodules of ivy_core, ivy_nn or ivy_stateful, there are .py available in scripts/shell.
All are run like: python scripts/setup_tests/run_ivy_nn_test.py 1, where 1 = numpy, 2 = torch, 3 = jax, and 4 = tensorflow.
More Detailed Hypothesis Logs in PyCharm#
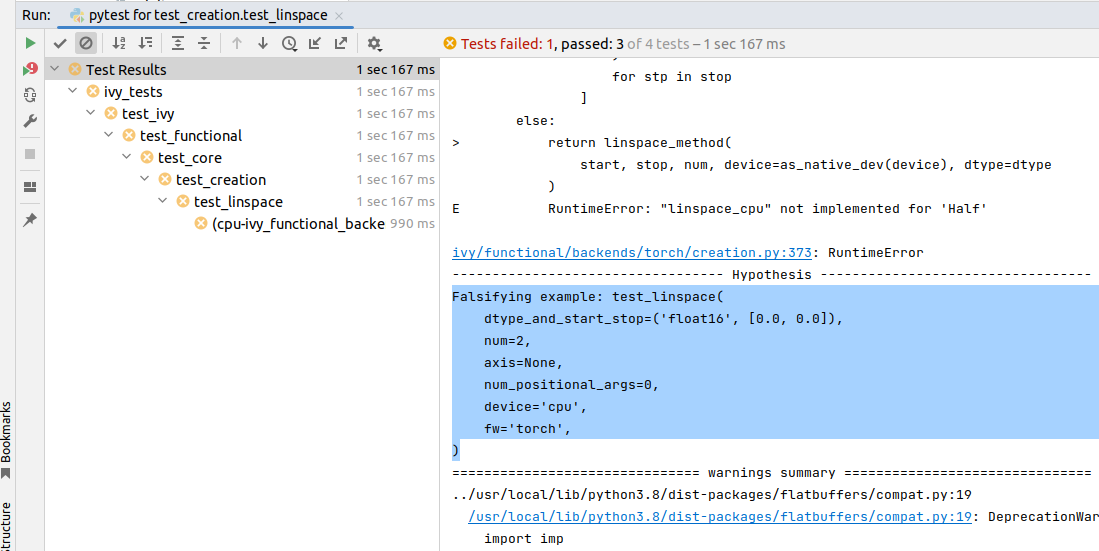
For testing, we use the Hypothesis module for data generation. During testing, if Hypothesis detects an error, it will do its best to find the simplest values that are causing the error. However, when using PyCharm, if Hypothesis detects two or more distinct errors, it will return the number of errors found and not return much more information. This is because PyCharm by default turns off headers and summary’s while running tests. To get more detailed information on errors in the code, we recommend doing the following:
Going to the settings -> Advanced
Using the search bar to search for ‘Pytest’
Make sure that the checkbox for ‘Pytest: do not add “–no-header –no-summary -q”’ is checked.
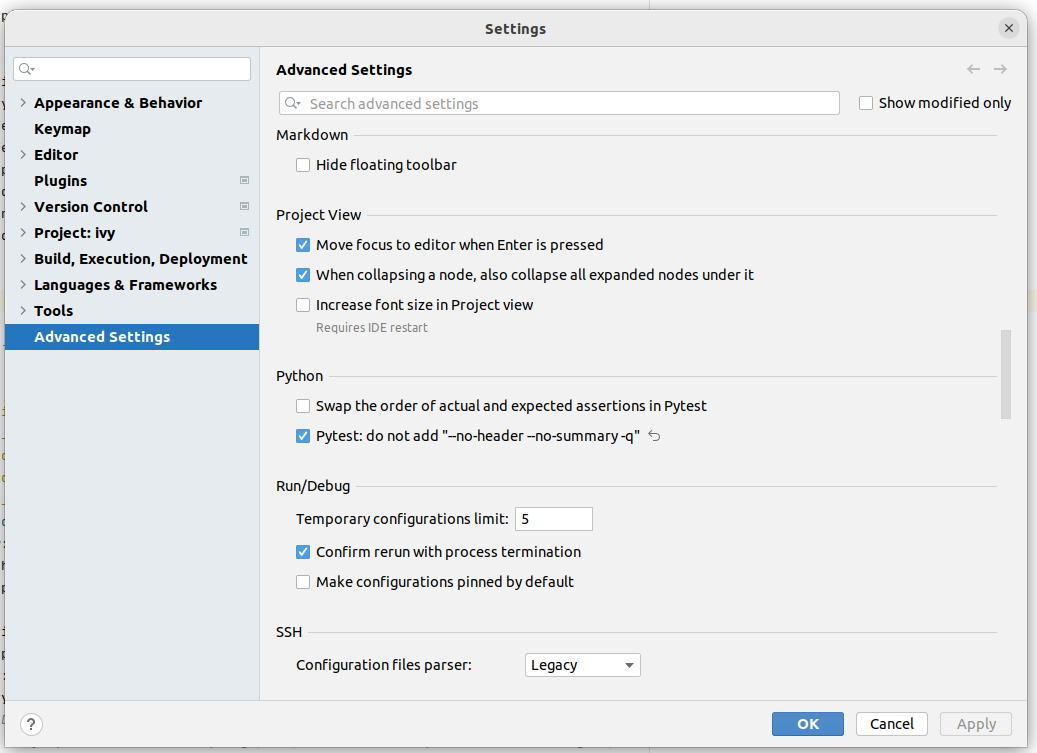
Now, if Hypothesis detects an error in the code it will return more detailed information on each of the failing examples:
For questions, please reach out on discord in the docker thread!
“Empty Suite” error fix:
Click on the “green arrow button” from where you run the function in PyCharm. Open “Modify Run Configuration…”, under “Target:” on the right side click on “…” it’ll open a new window, manually add the path to the specific function, For instance, for stateful -> “test_stateful.test_submodule_name.test_function_name” and for functional -> “test_submodule_name.test_function_name”, the function will pop up below, select that, click on “Apply” then “OK”. Now, do not run the test from the “green arrow button” in the left panel, run it from above where there is a “green arrow button” on the left side of the “debugger button” making sure you’ve selected the latest modified configuration of that specific test you want to run.
Setting up for Free#
Visual Studio Code is a recommended free alternative to setting up, especially if you’re not eligible for a student license with PyCharm Professional. The most easiest and the most efficient way would be using Visual Studio Code with the Docker extension. You’ll hopefully be done with this in no time. The steps to be followed are listed below:
Windows#
Install Docker Desktop
Install Visual Studio Code here
Open the Docker desktop, make sure it’s running while following the process below. You can close the Docker desktop window afterwards, Docker will continue to run in the background.
Open Visual Studio Code, open the Ivy repo folder, and follow the steps listed below:
At the bottom right a window will pop up asking for “Dev Containers” extension, install that. In case the window doesn’t pop up, search for the “Dev Containers” extension in the Visual Studio Code and install that.
Install the “Docker” extension for Visual Studio Code, you’ll easily find that by searching “docker” in the extensions tab.
Once done, restart Visual Studio Code, at the bottom left corner there would be an icon similar to “ >< “ overlapped on each other.
Clicking on that will open a bar at the top which will give you an option “Open Folder in Container…”, click on that.
You’ll be inside the container now, where you can locally run the tests that you’ve modified by running the command, “pytest test_file_path::test_fn_name”. Opening the container may take a long time, as the Docker image is very large (5+ GB).
Ubuntu#
Install Docker Engine
Install Visual Studio Code
Clone your fork of the Ivy repository.
Open Visual Studio Code, open the Ivy repo folder, and follow the steps listed below:
Install the
Dev ContainersandDockerextensions.Open the
.devcontainer/devcontainer.jsonfile.Add a comma (
,) to the end entry"postCreateCommand": "bash .devcontainer/post_create_commands.sh", making it"postCreateCommand": "bash .devcontainer/post_create_commands.sh",.Add in the line
"postStartCommand": "git config --global --add safe.directory ${containerWorkspaceFolder}"on the line immediately after thepostCreateCommandline.Click the remote explorer icon in the bottom left. It looks roughly like “><” overlapped on each other.
Click
Reopen in Containerin the dropdown menu.You’ll be inside the container now, where you can locally run the tests running the command,
pytest test_fle_path::test_fn_name. Opening the container may take a long time, as the Docker image is very large (5+ GB).
Important Note
For windows users, the file path should be entered with “/” (forward-slashes), for other OS it would be the regular “\” (back-slashes).
WSL#
It is understandable that working with computationally heavy tools like Docker and PyCharm is not always comfortable for developers. By utilizing WSL, you can run a Linux distribution on your Windows machine, and in addition, venv is leveraged to create isolated Python environments eliminating the need for a full-fledged containerization solution like Docker, and with VSCode being an appropriate alternative to PyCharm, the steps explained below will help you in setting up a less resource-intensive Ivy environment.
Install WSL.
Install Visual Studio Code. You can follow this guide to integrate WSL into VSCode.
Open the WSL terminal by typing in the name of your Linux distribution in the windows start menu (e.g.
Ubuntu).Create a virtual environment by following the steps below:
Install the python virtual environment package
venv.sudo apt install python3-venv
Create your virtual environment named
ivy_dev.python3 -m venv ivy_dev
Activate your environment.
source ivy_dev/bin/activate
You can now install the Ivy package from Github by running:
pip install git+https://github.com/unifyai/ivy.git
Or else, if you want to set up a local repository, you can do so by following this guide as explained above and install the required development dependencies by running:
cd ivy/
pip install -r requirements/requirements.txt
pip install -r requirements/optional.txt
Once done, you can now open VSCode right from your terminal and get started with your development by just running:
code .
To set up the Python Interpreter in VSCode, go to the command palette (Ctrl+Shift+P) and type Python: Select Interpreter and select the environment you created. For a more detailed explanation, you can follow this guide.
Now that your development environment is set up, you can now run tests locally by running
pytest test_fle_path::test_fn_namein the terminal or if you want to set up testing in VSCode, you may follow the guide Setting Up Testing for VSCode as explained below, next to this subsection.
GitHub Codespaces#
It can be a headache to install Docker and setup the PyCharm development environment, especially on recent ARM architectures like the new M1 Macs.
Instead, we could make use of the GitHub Codespaces feature provided; this feature creates a VM (Virtual Machine) on the Azure cloud (which means no local computation) with the same configuration as defined by ivy/Dockerfile.
Since it’s a VM, we no longer have to worry about installing the right packages, modules etc.
We can develop as we usually do on Visual Studio Code with all your favourite extensions and themes available in Codespaces too.
With all the computations being done on the cloud, we could contribute to Ivy using unsupported hardware, old/slow systems, even from your iPad as long as you have Visual Studio code or a browser installed.
Important Note
There are several versions of GitHub. If you are using the free one you will have limited access to GitHub Codespaces, you can read the exact quotas available here.
Pre-requisites
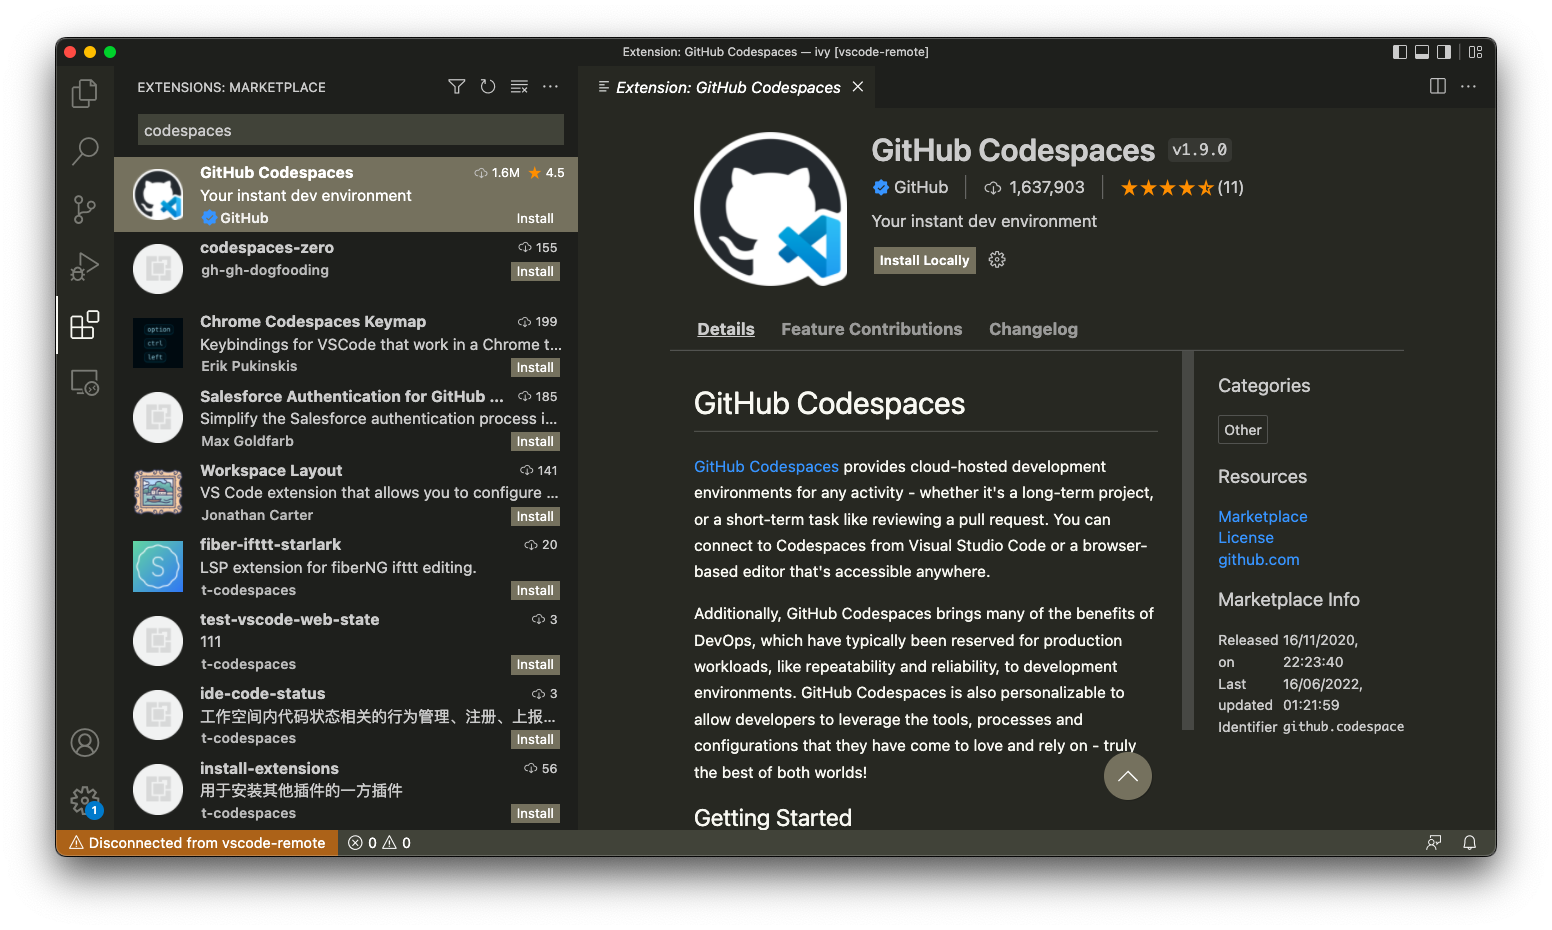
Before we setup GitHub Codespaces, we need to have Visual Studio Code installed (you can get it from here).
Once the Visual Studio Code is installed, head over to the extension page (it’s icon is on the left pane), search “Codespaces” and then install the extension locally.
Now we are ready to begin!
Setting up Codespaces
Just follow the steps outlined below:
Go to your fork of
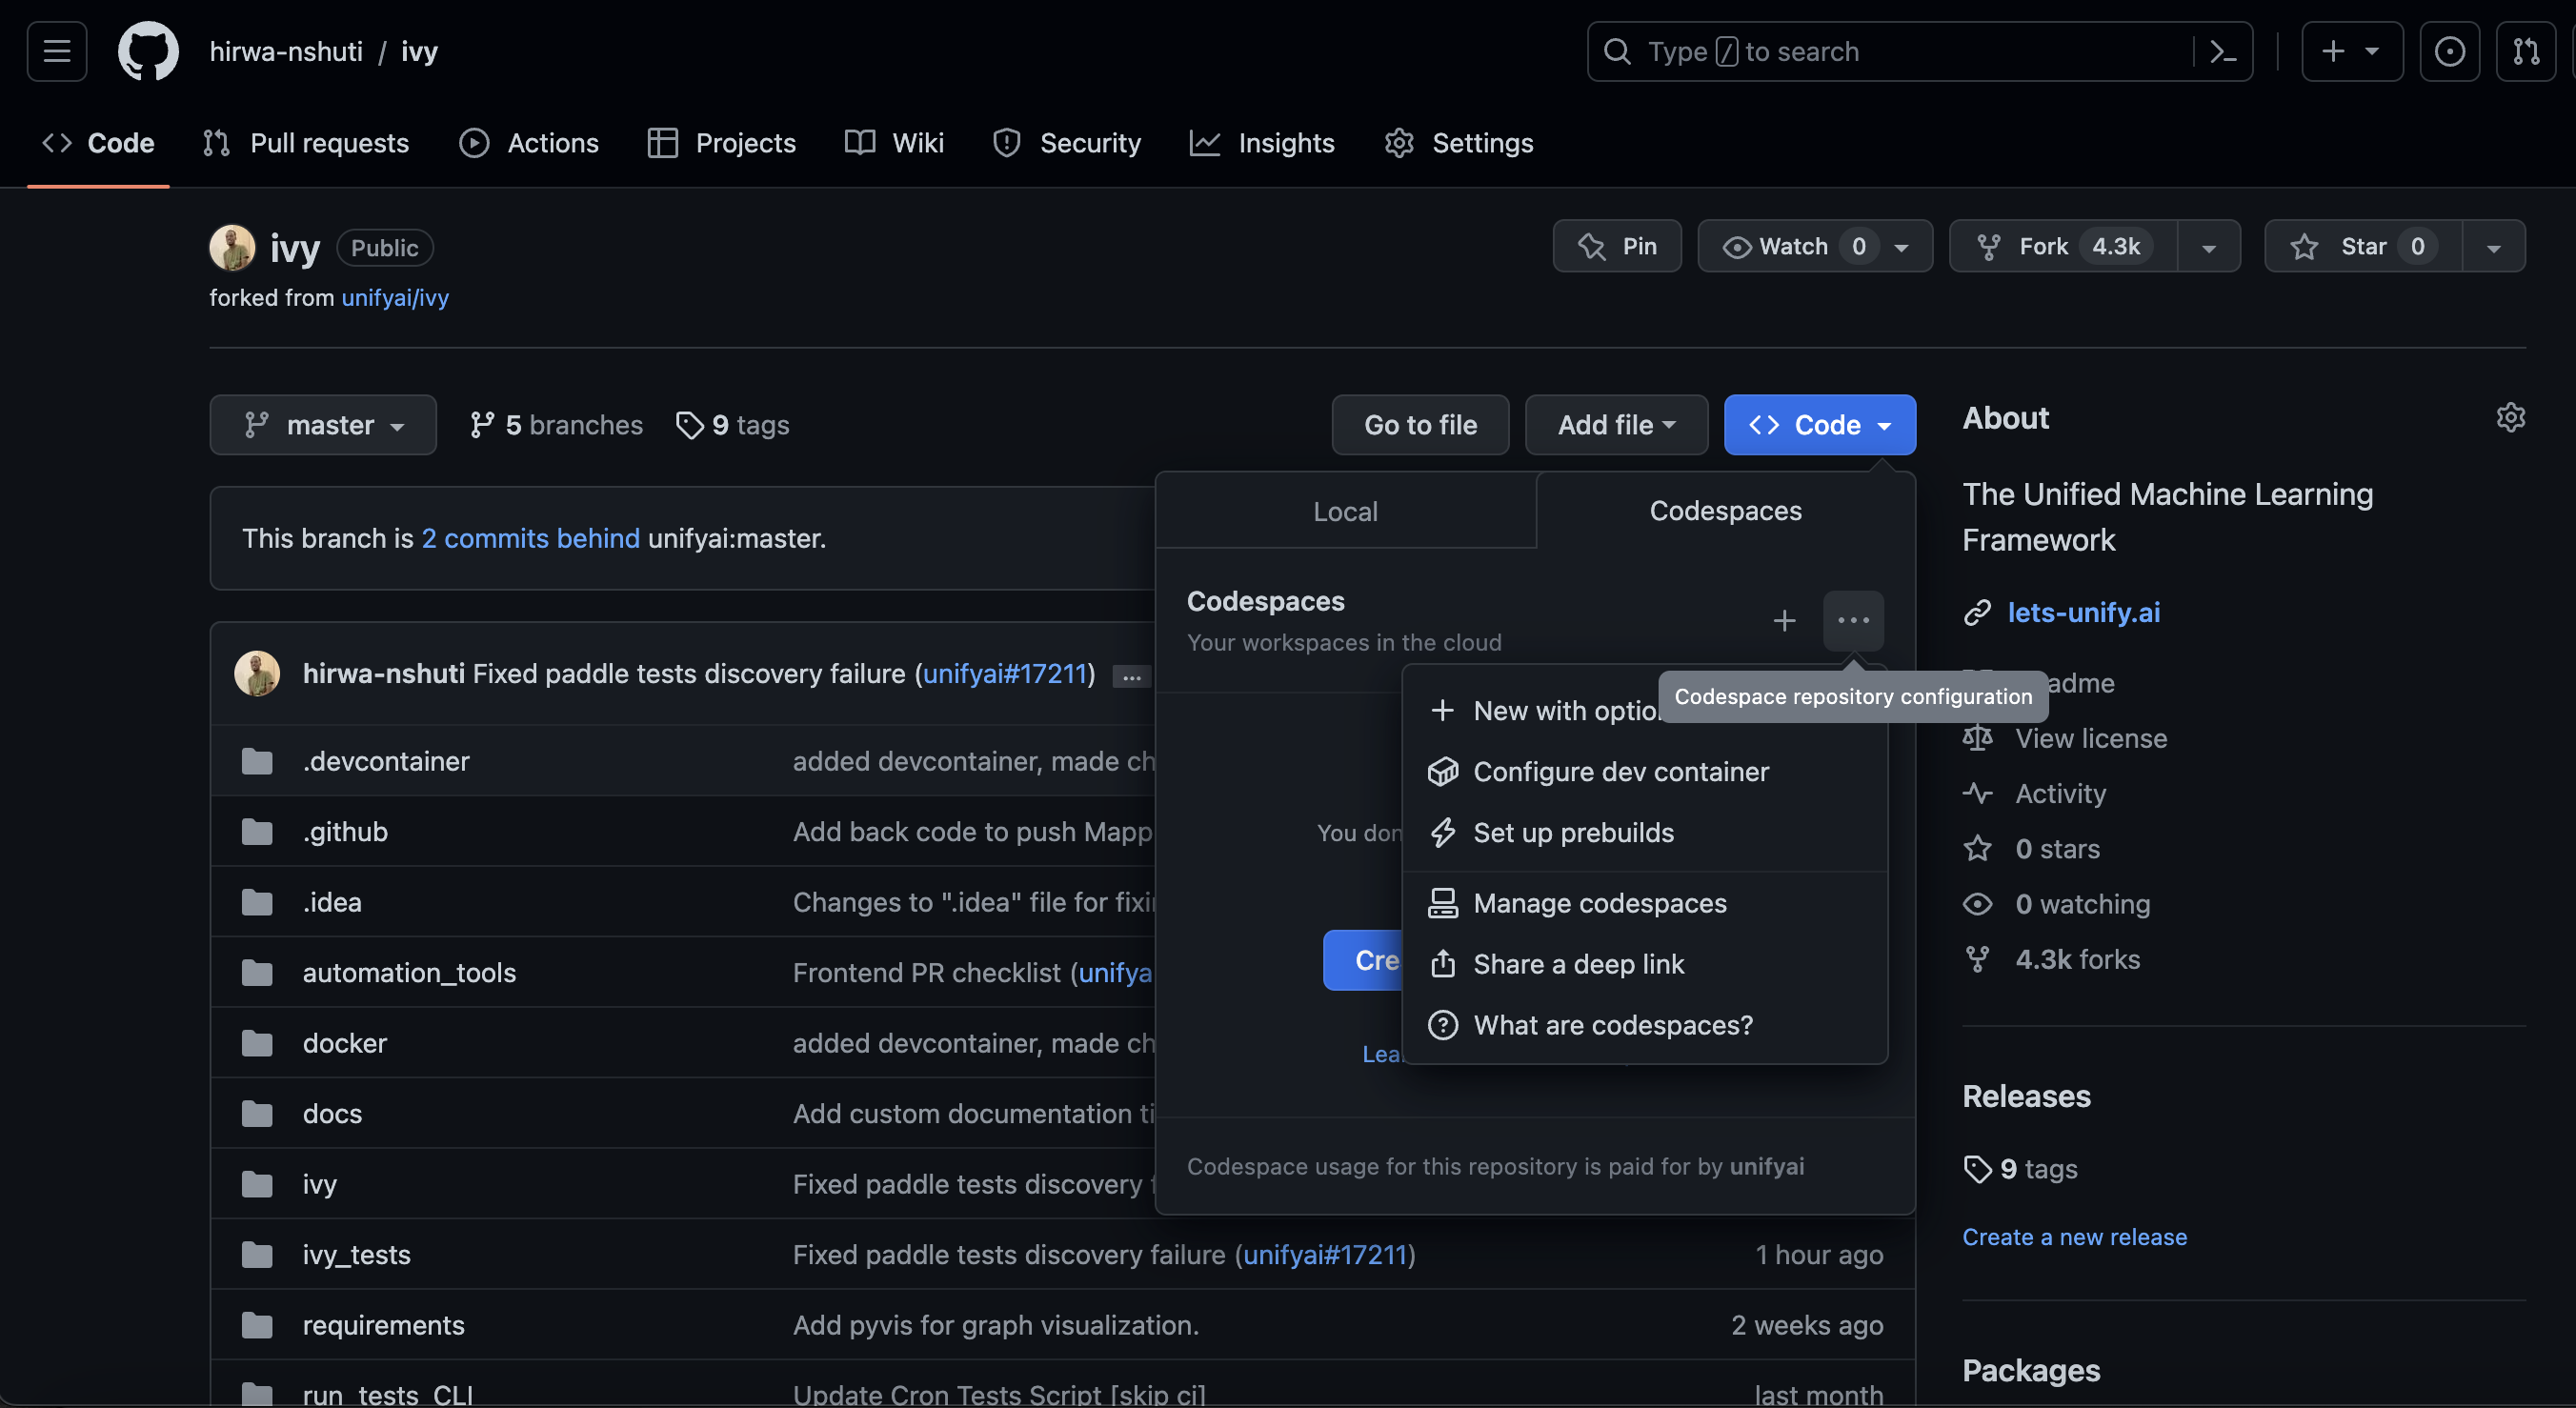
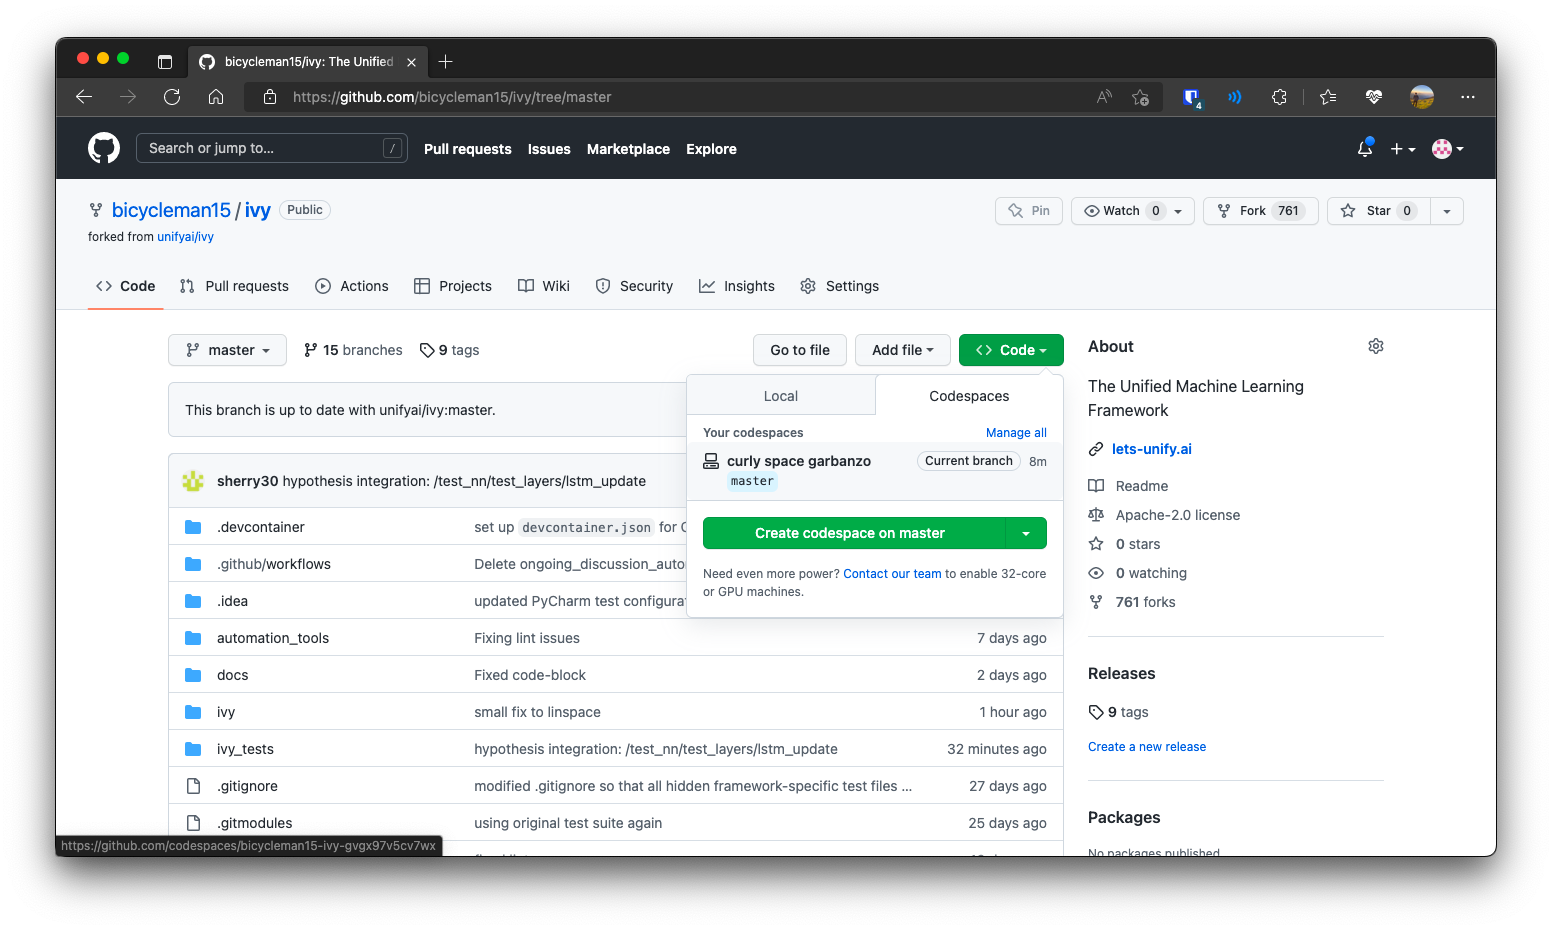
ivy, and then click on the green “Code” dropdown, go to the Codespaces tab, and then click on three dots, then clicknew with options....
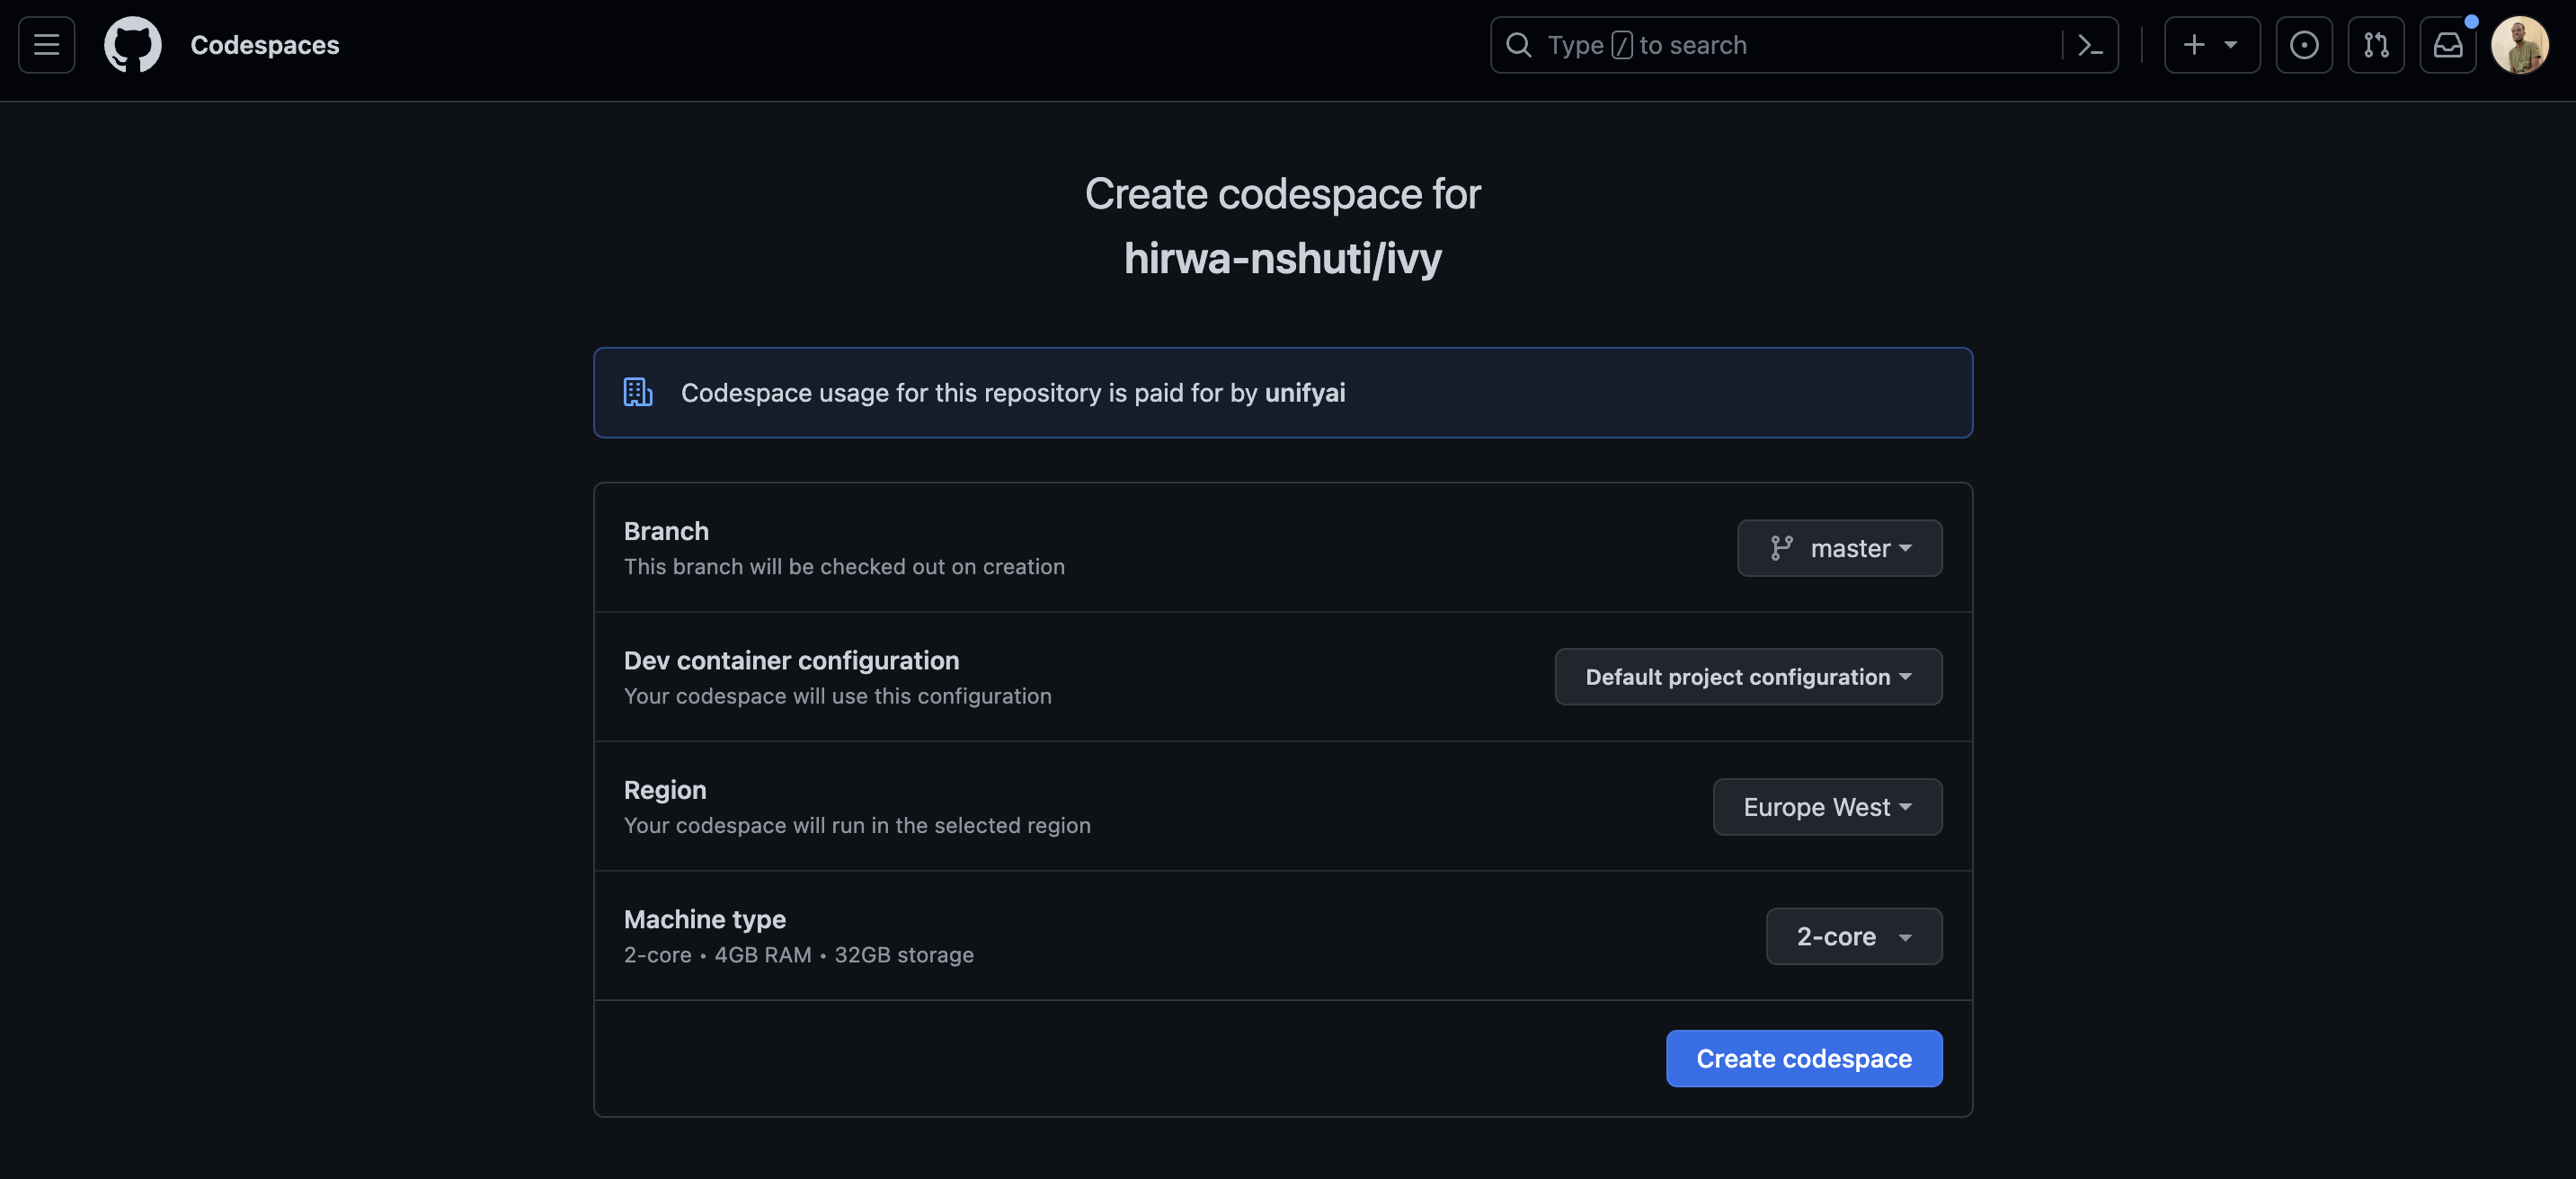
You will get the following screen, then you will select the branch.
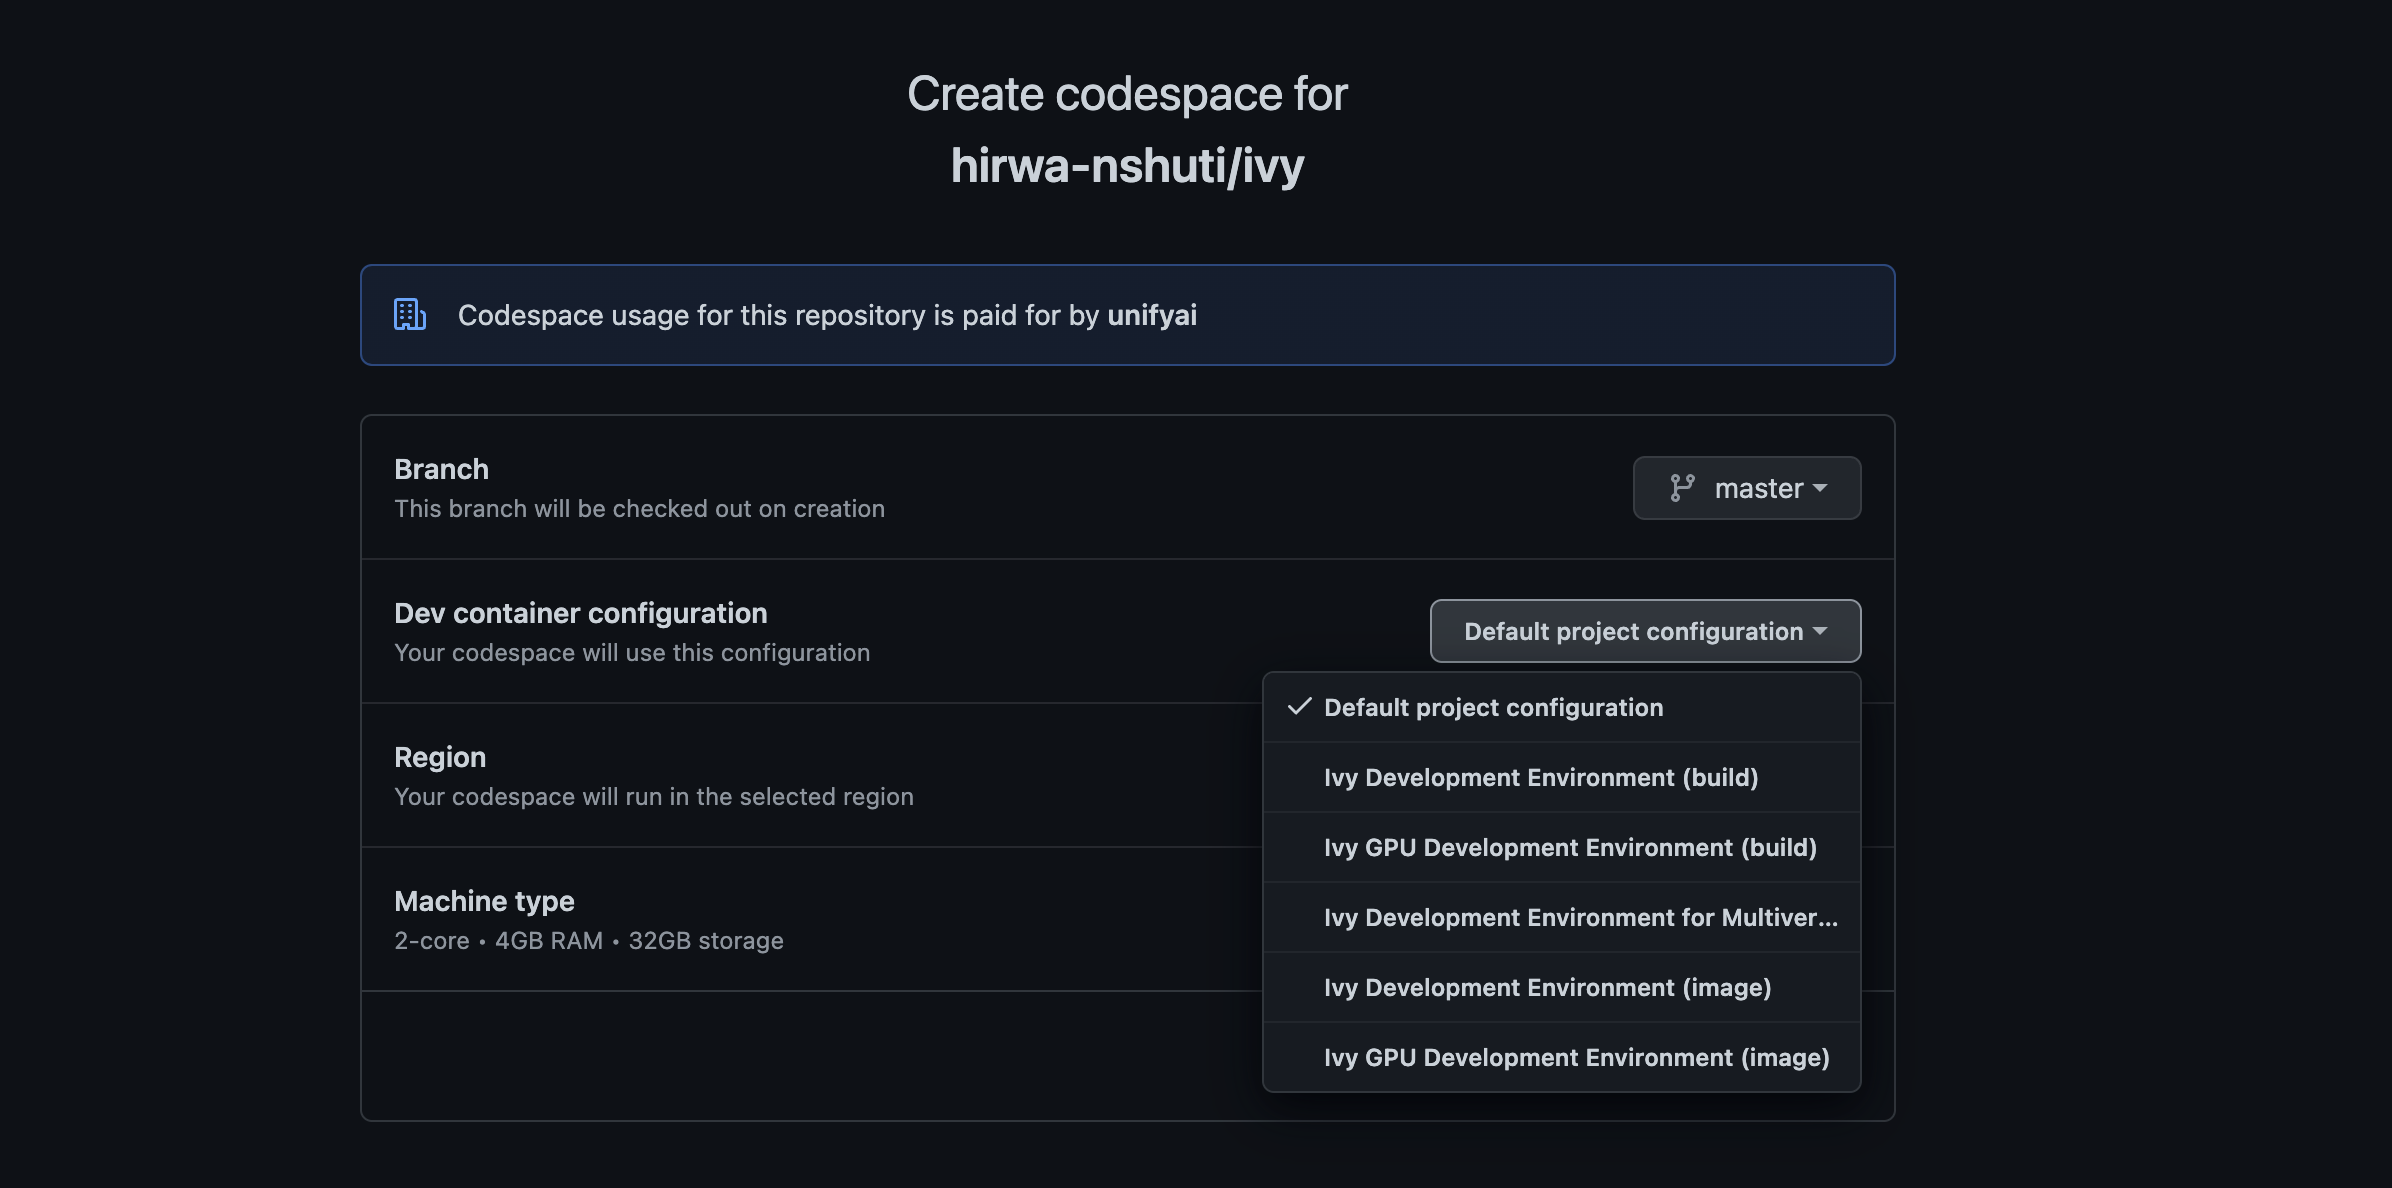
Then you will head to the dropdown of “Dev container configuration”, then select an image to set up with. As there are six options available as of now
Default project configuration- This is the default option, it will set up with the default codespaces environment.Ivy Development Environment (build)- This will set up the development environment of ivy for CPU and build image fromivy/docker/Dockerfile.Ivy GPU Development Environment (build)- This will set up the development environment of ivy for GPU and build image fromivy/docker/DockerfileGPU.Ivv Development Environment for Multiver...- This will set up the development environment of multiversion support with ivy and build image fromivy/docker/DockerfileMultiversion.Ivy Development Environment (image)- This will set up the development environment of ivy for CPU and build image from the latest image from dockerhub.Ivy GPU Development Environment (image)- This will set up the development environment of ivy for GPU and build image from the latest image from dockerhub.
For now, we will select
Ivy Development Environment (image). Select your region and preferred machine type, then click on “Create Codespace”.
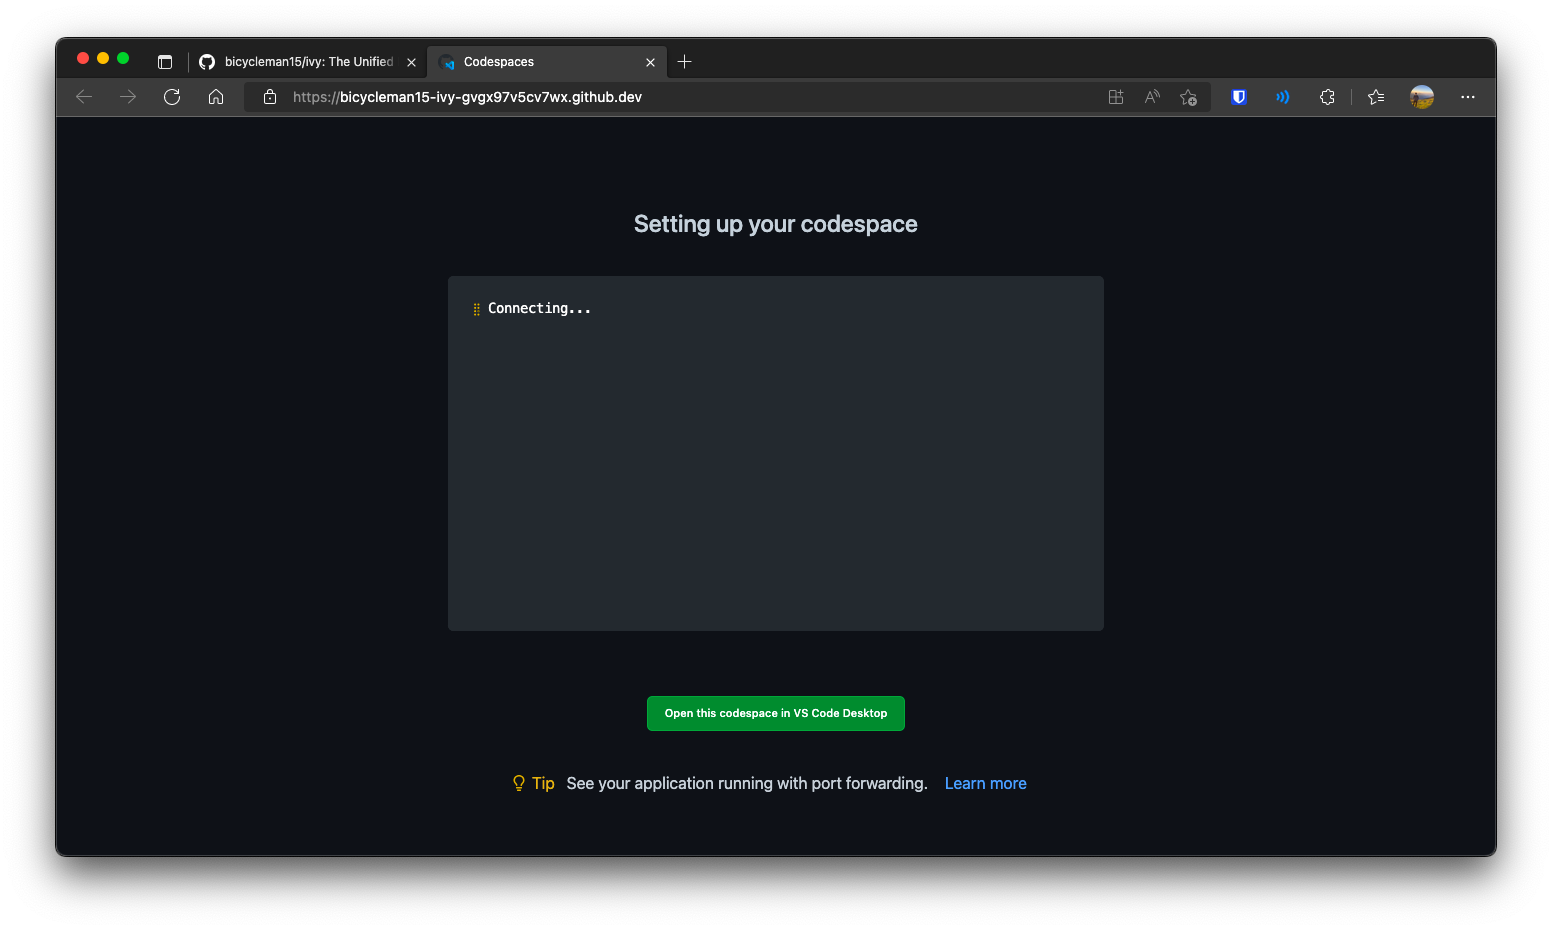
4. This will open up a new tab, where you click on “Open this codespaces on VS code desktop”. Give the relevant permissions to the browser to open up Visual Studio Code.
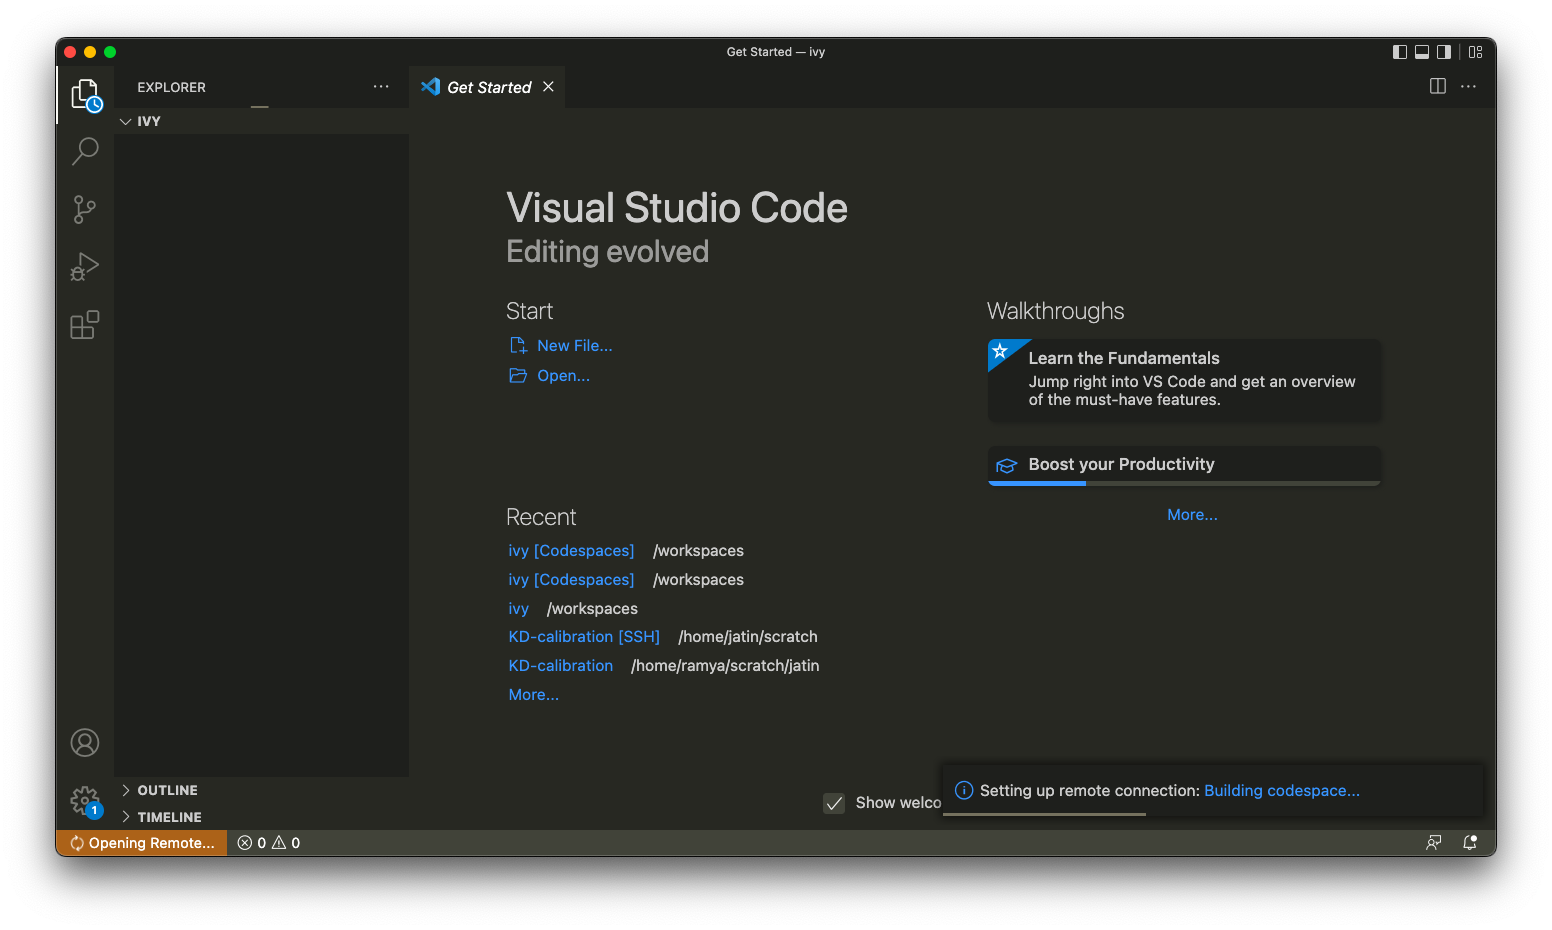
5. Once visual studio code opens up, it will start building the remote container. In order to view the logs while the container is being built, you may click on “Building Codespace…” on the bottom right box. Please be patient while the container is being built, it may take upto 10-15 minutes, but it’s a one-time process. Any subsequent connections to your ivy codespace will launch in 10-12 seconds.
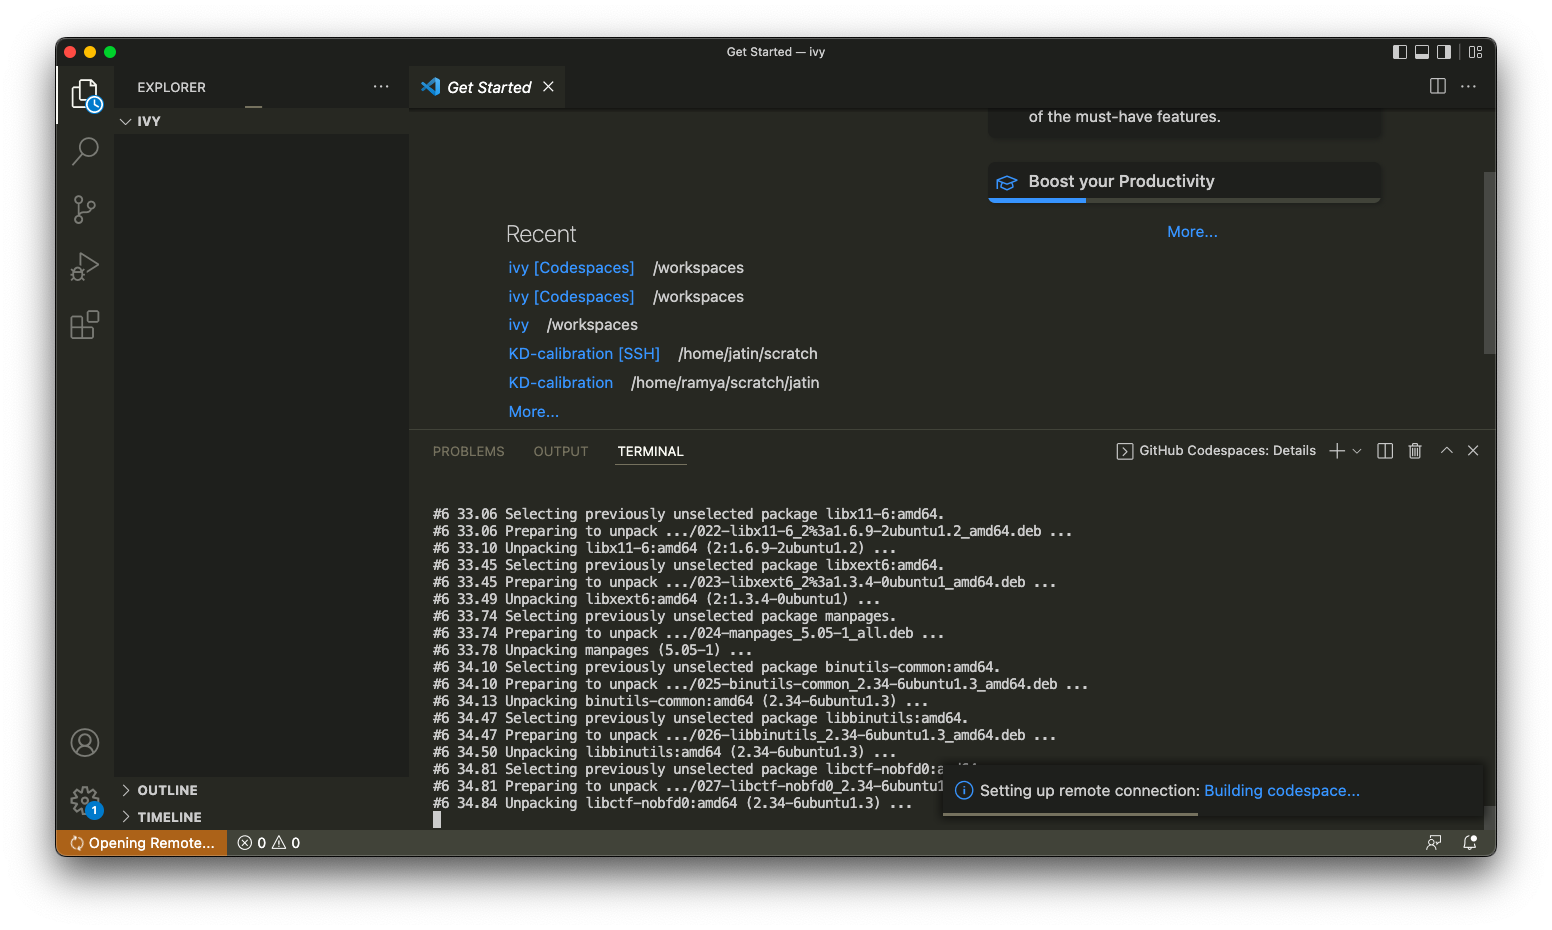
The Log of the container being built would look like the below:
Once the container is built, you would see the following output log saying “Finished configuring codespace”.
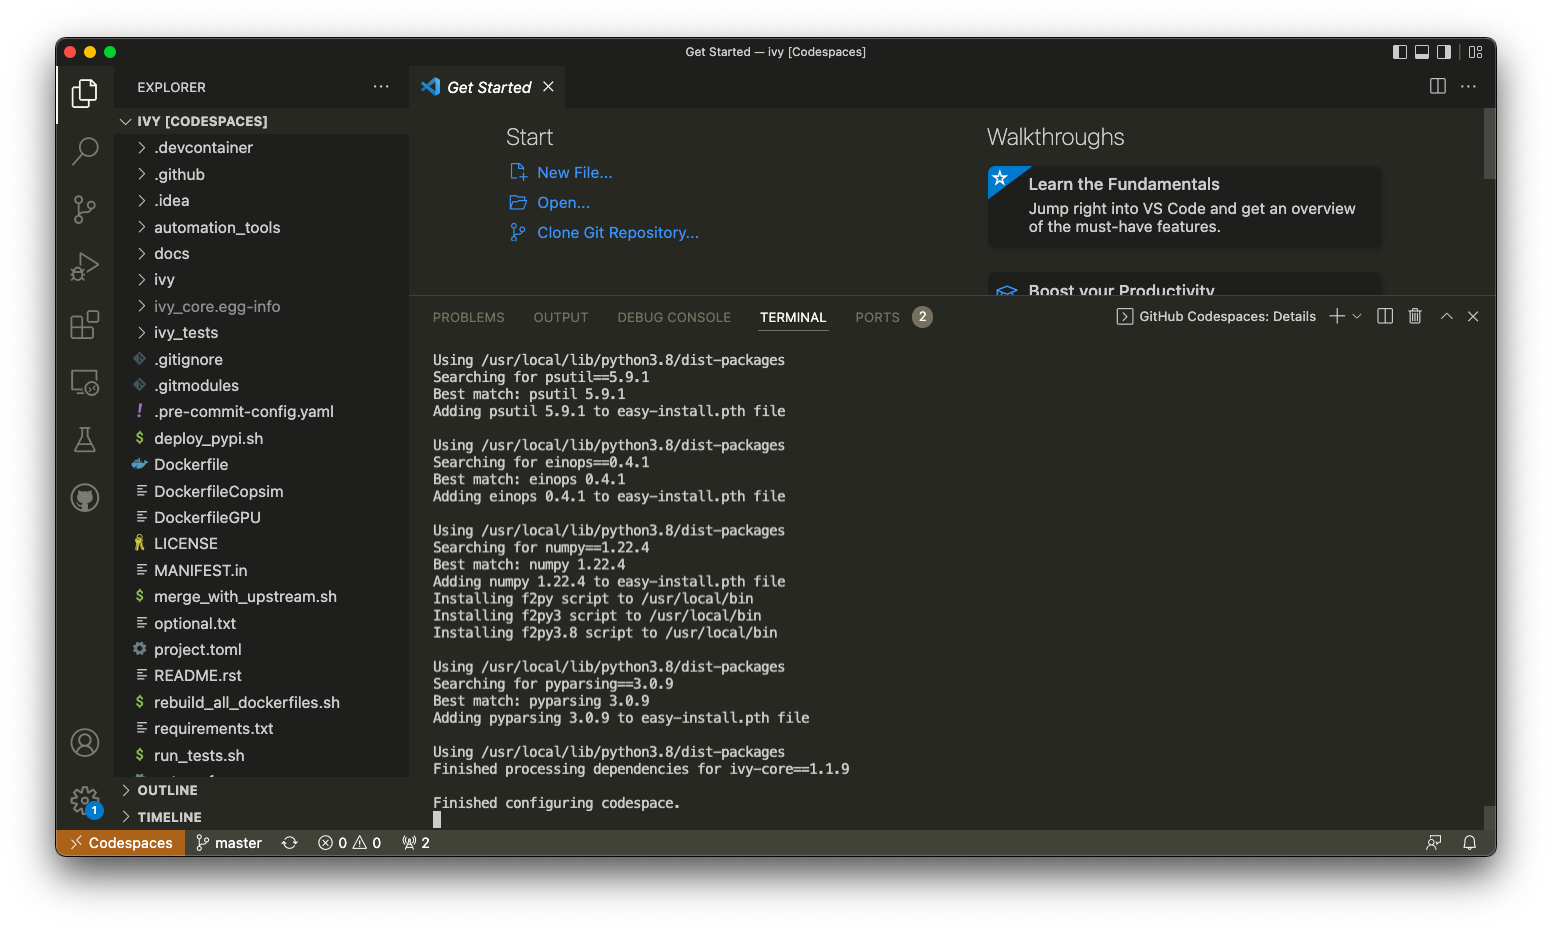
7. That’s it, you have just setup GitHub codespaces and can start developing Ivy. The configuration files install all the required packages, and extensions for you to get started quickly.
Setting up Codespaces with a GPU
If you want to setup a GPU instance on codespaces and also have access to it, kindly follow the guidelines below:
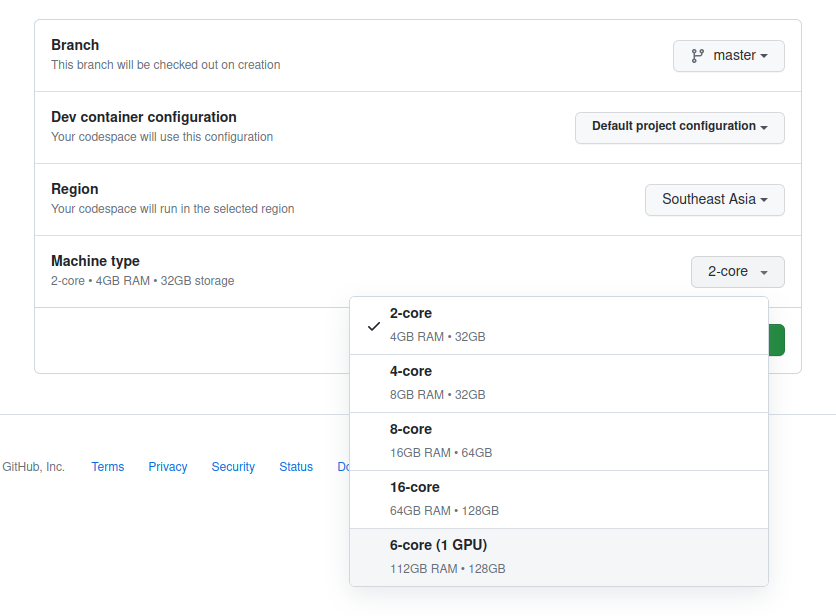
Points 1 and 2 are the same from ref:Setting up Codespaces section above. You will be on a screen shown below. Just select the Machine Type to be “6-Core (1 GPU)”.
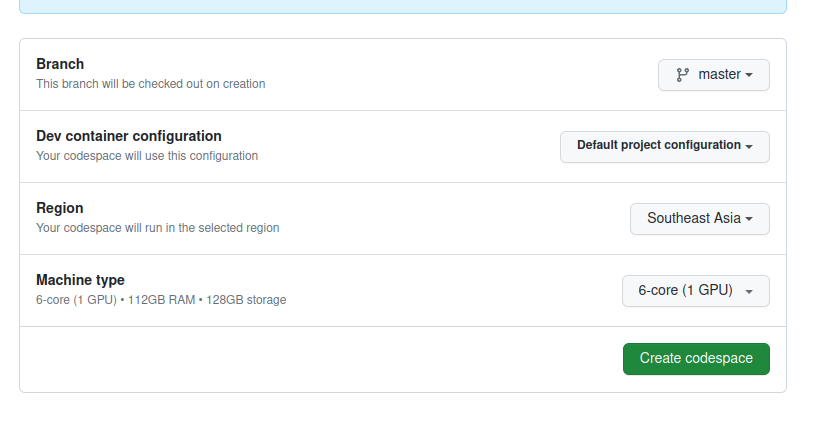
Refer to the ref:Setting up Codespaces section for the other configurations such as the “Dev container configuration”. Your Machine Type section will look like the following image shown below. Feel free to click on the green button to create the instance.
Opening an existing Codespace
If you have already setup codespaces, refer to the following to open your previously setup codespaces environment.
There are 3 ways to connect your existing codespaces, you can use any of the approaches mentioned below.
1. Go to your fork of ivy, click on the green coloured dropdown “Code”, go to the codespaces tab, then select your codespace. This will open up a new tab, from there either you can develop on the browser itself, or click on “Open this codespaces on VS code desktop” to open up the visual studio code application and develop from there.
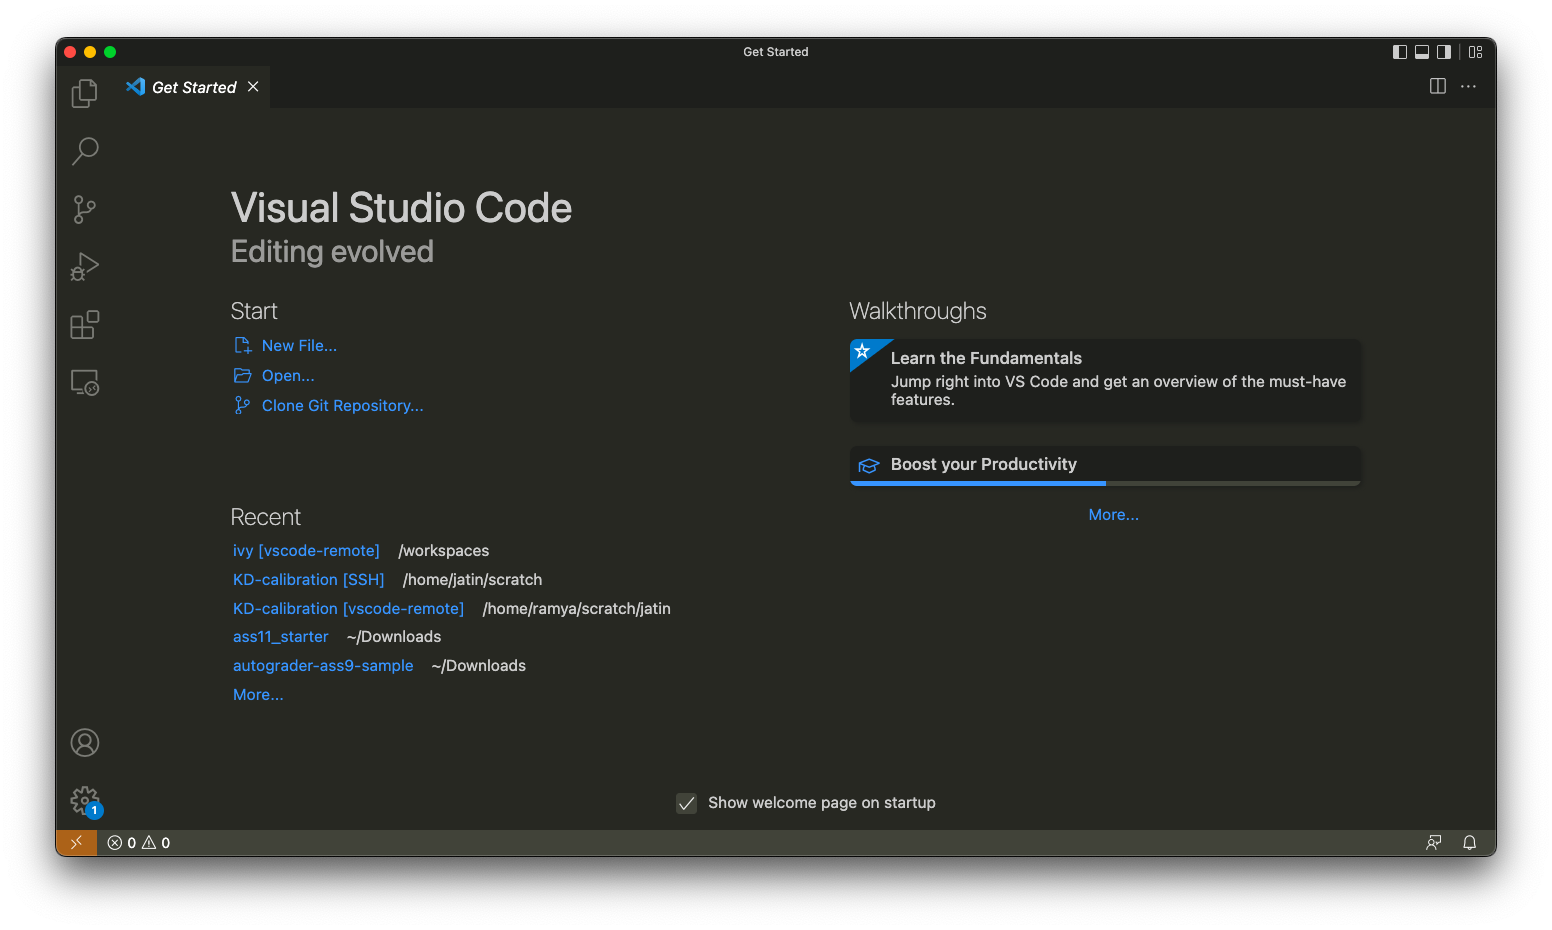
2. Another way to connect is to open up the visual studio code application.
There is a good chance that you would see ivy [Codespaces] or ivy [vscode-remote] on your recently opened projects.
If you click either of those, it will open up your codespace.
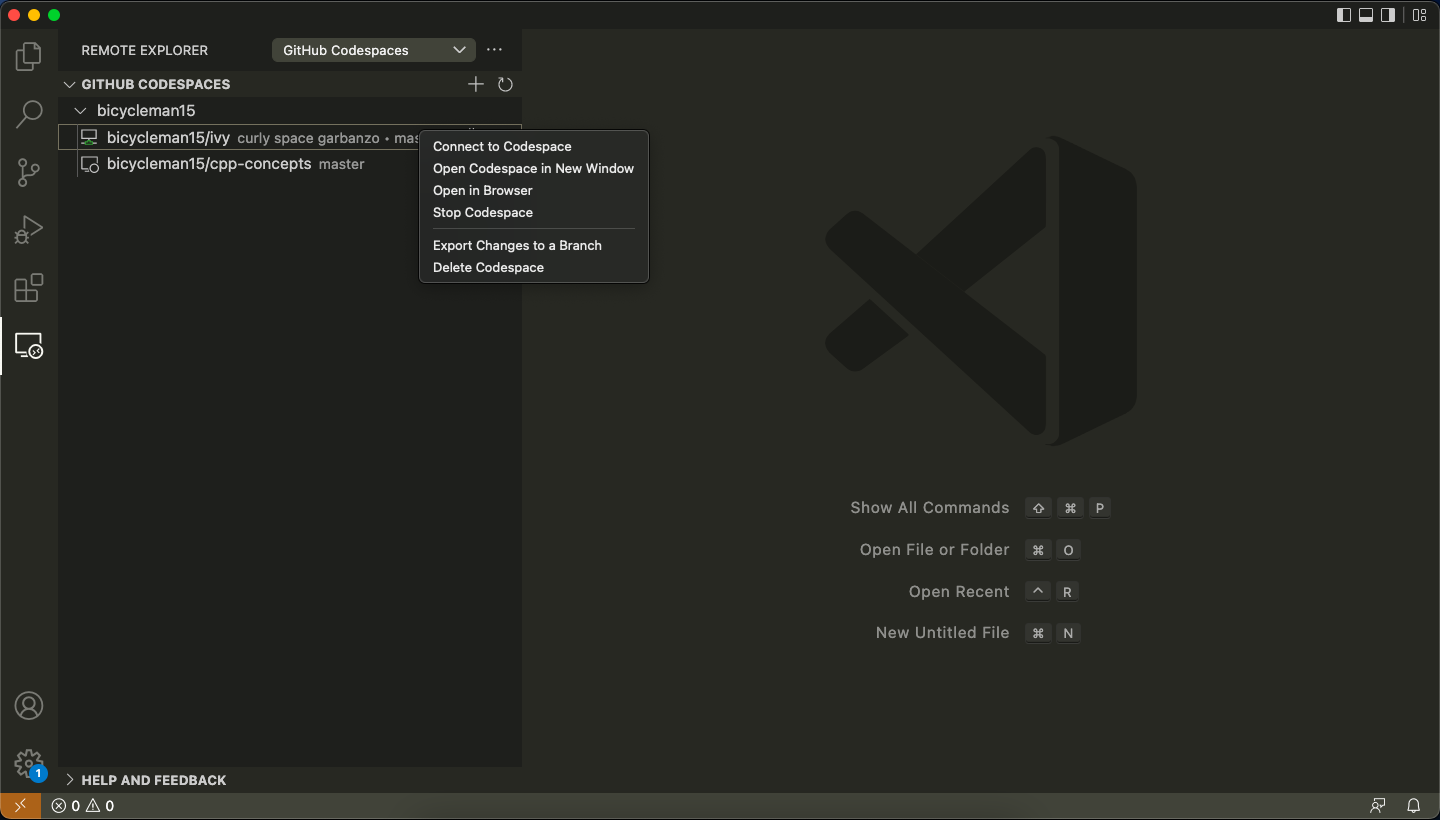
3. If in any case, it doesn’t show your codespace on recent projects, go to the “Remote Connection Explorer” extension tab on the left pane, from there make sure you have selected “Github Codespaces” on the top-left dropdown. Once you find your codespace, right click on it and then select “Connect to codespace in current window”.
Troubleshooting
Sometimes, visual studio code is not able to select the python interpreter.
However, you can do that manually if that ever happens.
Open up any python file, then click on the bottom right where it is written “Select Python Interpreter”.
From there, select Python 3.8.10 64-bit usr/bin/python3.
Setting Up Testing
The steps are as following to setup testing on VS Code when using a new Codespace.
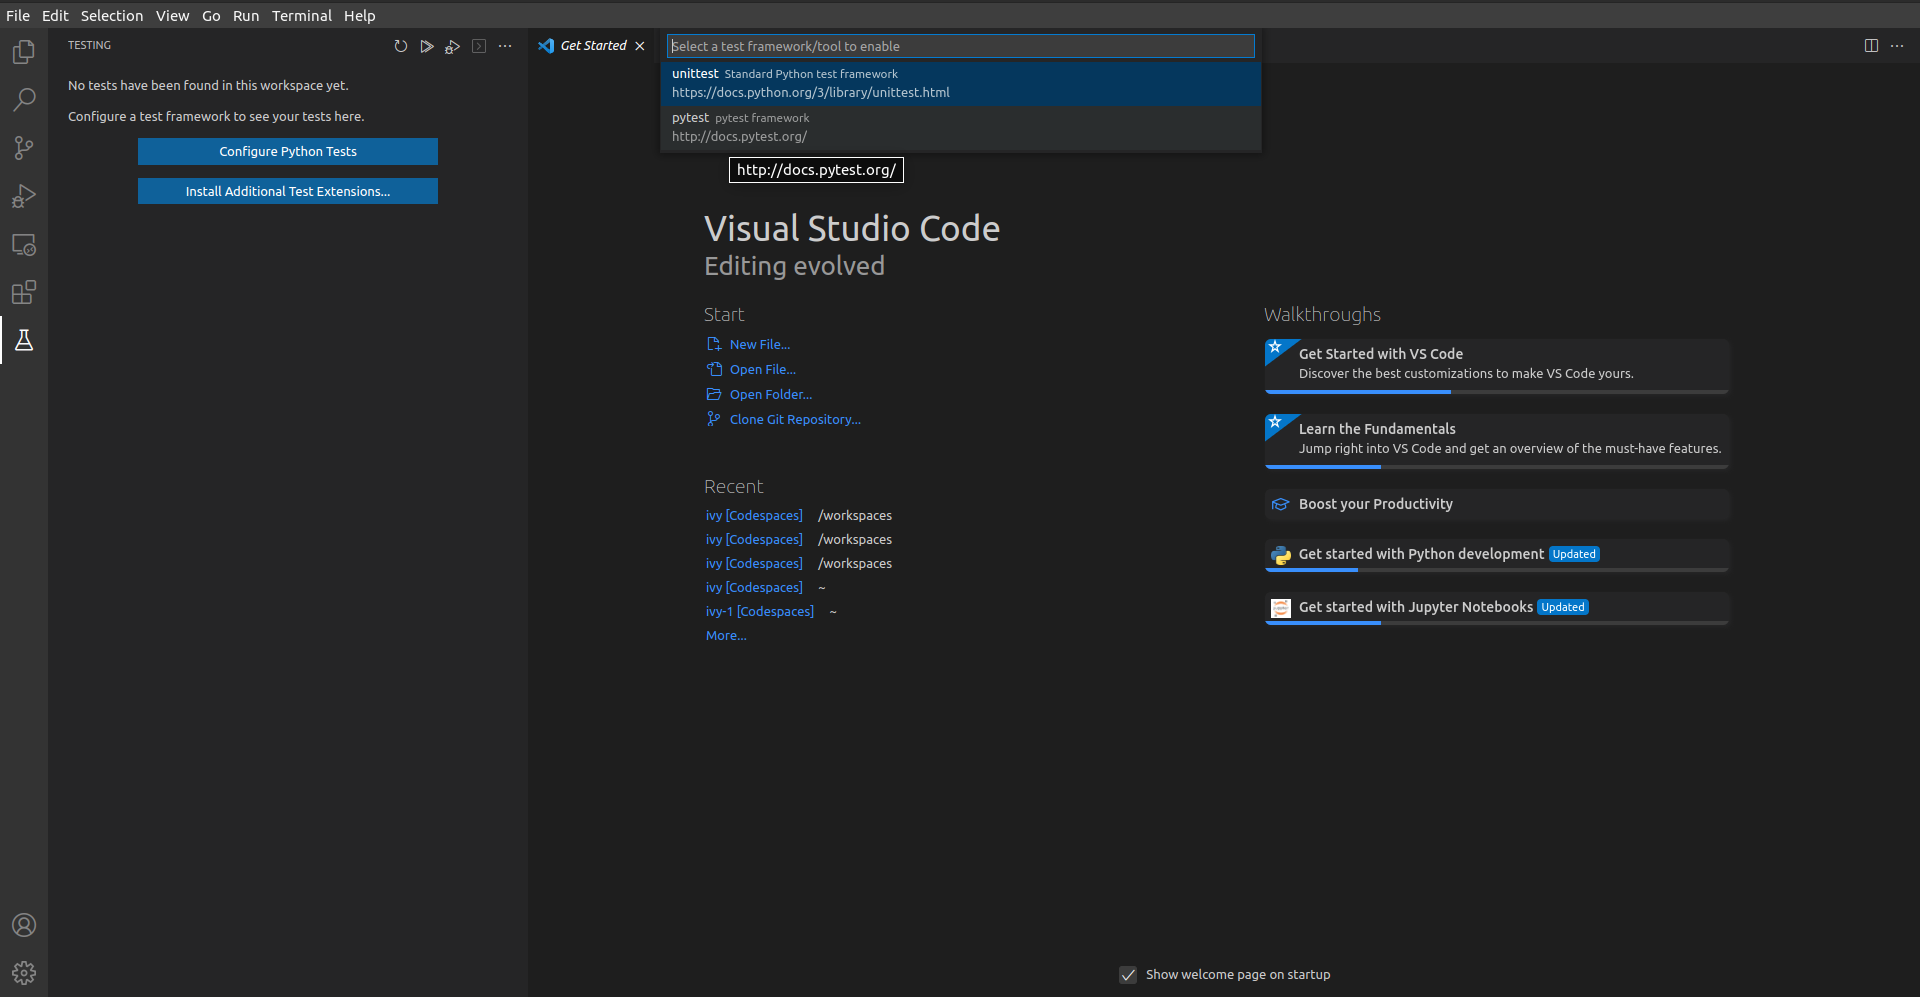
Under the flask Icon in the toolbar select “Configure Python Tests” and select PyTest as the test framework.
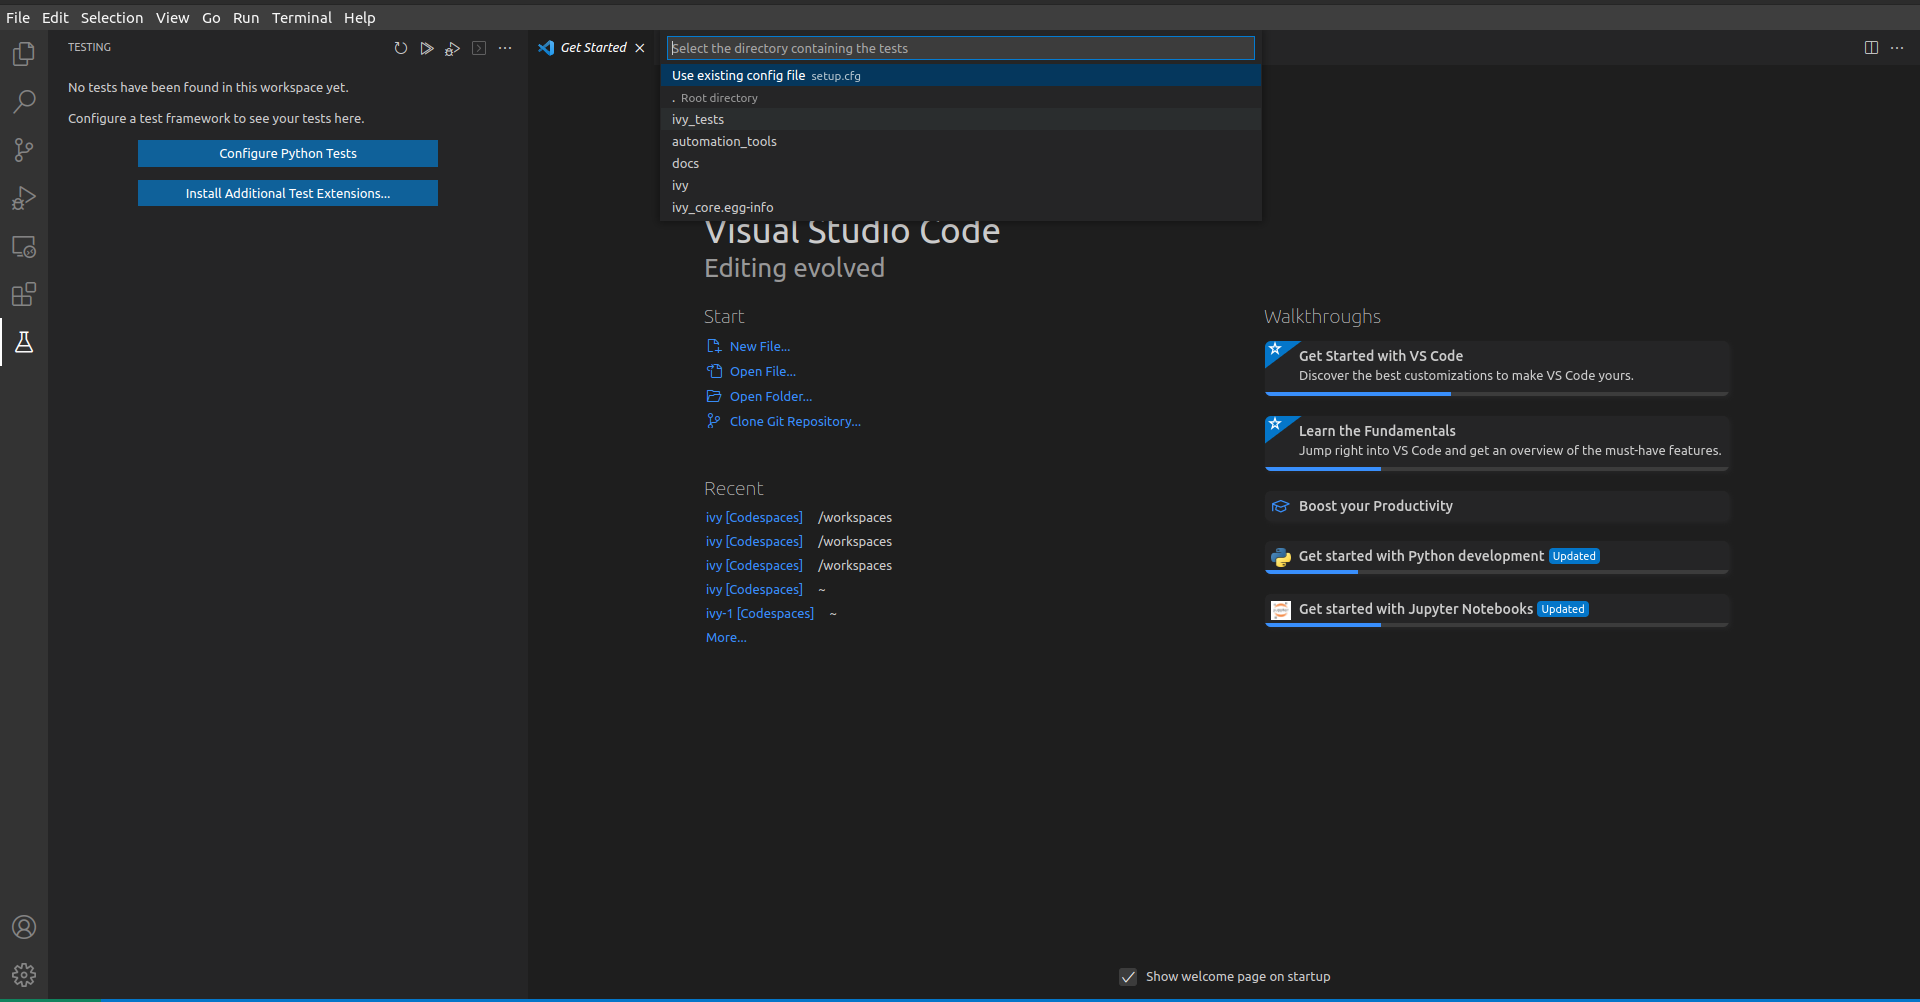
Select ivy_tests as the root directory for testing.
Configure the _array_module.py file in the array_api_tests to be set to one of the supported frameworks.

Following all of this, you should refresh the test suite and you should now be able to run tests right from VS Code!
To simply run the tests using the play button in the toolbar, you will need to add the .vscode folder to your workspace. Then add the
settings.jsonfile containing the following:
{
   "python.testing.pytestArgs": [
      "./ivy_tests/test_ivy/",
      "./ivy_tests/array_api_testing/test_array_api/",
      "--continue-on-collection-errors",
   ],
   "python.testing.unittestEnabled": false,
   "python.testing.pytestEnabled": true,
   "python.testing.autoTestDiscoverOnSaveEnabled": true,
}
Note: Currently you do not need to comment out the conftest.py file in the array_api_tests directory.
The Binaries#
Some features in ivy are served as compiled binaries, such as the transpiler.
These binaries aren’t maintained in the ivy repository directly, but on a separate binaries repository.
All the binaries that are required to make use of the full potential of ivy are recorded in the binaries.json.
The supported configurations (Python version - OS - Architecture) are recorded in the available_configs.json.
The format of representing a configuration is based on PyPI’s platform compatibility tags,
meaning cp310-none-manylinux_2_17_x86_64 represents a configuration that can be used in a Python 3.10 environment on a linux system with x86-64.
We continue to add support to many more supported configurations to our binaries to work with various python versions, OS and architecture.
On installing ivy with pip install -e . all the required binaries with a supported configuration to your system get downloaded.
Just to have another check on whether all binaries are present, there’s a warning that gets thrown when you import ivy if any binaries are missing of the form,
WARNING:root:   Some binaries seem to be missing in your system. This could be either because we don't have compatible binaries for your system or that newer binaries were available.
                In the latter case, calling ivy.utils.cleanup_and_fetch_binaries() should fetch the binaries binaries. Feel free to create an issue on https://github.com/unifyai/ivy.git in case of the former

WARNING:root:
Following are the supported configurations :
compiler : cp38-none-manylinux_2_17_x86_64, cp310-none-manylinux_2_17_x86_64
engines : cp310-none-manylinux_2_17_x86_64

WARNING:root:   /workspaces/ivy/ivy/compiler/_compiler.so not found.
In case there are no supported binaries for your configuration, then feel free to create an issue on the ivy repo asking for adding support to the same.
Feel free to ignore the warning in the meantime, set a logging level to avoid receiving the warning.
In case the you are using a supported configuration and still receiving this warning, it indicates that you are yet to do a pip install -e . as mentioned in the previous sections.
Running a pip install -e . is sufficient to download the binaries if they’re supported but the ivy.utils.cleanup_and_fetch_binaries() function is provided just in case you want to download the binaries without a local installation.
import ivy

ivy.utils.cleanup_and_fetch_binaries()
Note
Bear in mind that the binaries are not required for working on the open tasks for the most part, so it’s totally fine to not have the binaries downloaded on your system for working on any of the open tasks.
Video
Round Up
This should have hopefully given you a good understanding of how to get things properly set up.
If you have any questions, please feel free to reach out on discord in the pycharm thread, docker thread, pre-commit thread, pip packages thread depending on the question!