![]()
Using TensorFlow Models in your PyTorch Projects#
Framework Incompatibility#
PyTorch has emerged as one of the most popular deep learning frameworks. Its Pythonic design and superior eager execution mode made it a favorite among ML researchers, and its popularity is increasingly spanning out into industry. Still, practitioners with large codebases written in other frameworks, such as TensorFlow, are unable to take advantage of PyTorch’s rich ecosystem of state-of-the-art (SOTA) models and libraries, as this requires converting their code manually and inaccurately.
Ivy’s transpiler allows ML practitioners to dynamically connect libraries, layers and models from different frameworks together. For TensorFlow users, the transpiler provides a seamless and accurate way to introduce code written in TensorFlow to PyTorch pipelines.
In this blog post, we’ll go through an example of how the transpiler can be used to convert a model from TensorFlow to PyTorch and train the converted model in PyTorch.
Transpiling a TensorFlow model to PyTorch#
About the transpiled model#
To illustrate a typical transpilation workflow, we’ll be converting a pre-trained ConvNeXt model from TensorFlow to PyTorch, and using the transpiled model to run inference.
ConvNeXt belongs to the convolutional neural networks (CNN) category of model architectures and takes inspiration from the design of vision transformers. This high-performing computer vision model integrates strengths from both vision transformers and CNNs, by using both depth-wise convolutions and self-supervised learning to excel in various visual tasks. Compared to conventional CNNs, ConvNeXt demonstrates improved accuracy and scalability, sometimes rivalling even Transformer models.
Architecturally, a ConvNeXt block is similar to a ResNet block but differs in terms of the specific convolutional layers used, grouped convolution, normalization, activation function, and downsampling. Going through the detials of the models is outside the scope of this demo, interested readers might want to go through the paper.
Setting-up the source model#
We import the necessary libraries. We’ll mostly use the Keras wrapper to load the model, Ivy to transpile it from TensorFlow to PyTorch, and PyTorch functions to prepare the data and fine-tune the transpiled model.
[1]:
import requests
from PIL import Image
from tqdm import tqdm
import tensorflow as tf
tf.config.experimental.set_memory_growth(
   tf.config.list_physical_devices("GPU")[0], True
)
import torch
import numpy as np
import ivy
ivy.set_default_device("gpu:0")

torch.manual_seed(0)
tf.random.set_seed(0)
2024-03-12 17:51:38.926817: E external/local_xla/xla/stream_executor/cuda/cuda_dnn.cc:9261] Unable to register cuDNN factory: Attempting to register factory for plugin cuDNN when one has already been registered
2024-03-12 17:51:38.926873: E external/local_xla/xla/stream_executor/cuda/cuda_fft.cc:607] Unable to register cuFFT factory: Attempting to register factory for plugin cuFFT when one has already been registered
2024-03-12 17:51:38.928224: E external/local_xla/xla/stream_executor/cuda/cuda_blas.cc:1515] Unable to register cuBLAS factory: Attempting to register factory for plugin cuBLAS when one has already been registered
2024-03-12 17:51:38.936743: I tensorflow/core/platform/cpu_feature_guard.cc:182] This TensorFlow binary is optimized to use available CPU instructions in performance-critical operations.
To enable the following instructions: AVX2 FMA, in other operations, rebuild TensorFlow with the appropriate compiler flags.
2024-03-12 17:51:40.071672: W tensorflow/compiler/tf2tensorrt/utils/py_utils.cc:38] TF-TRT Warning: Could not find TensorRT
Download the mapping of classes to labels in the ImageNet dataset and set the default device
[2]:
!wget https://gist.githubusercontent.com/yrevar/942d3a0ac09ec9e5eb3a/raw/238f720ff059c1f82f368259d1ca4ffa5dd8f9f5/imagenet1000_clsidx_to_labels.txt
with open("imagenet1000_clsidx_to_labels.txt") as f:
    idx2label = eval(f.read())
--2024-03-12 17:51:44--  https://gist.githubusercontent.com/yrevar/942d3a0ac09ec9e5eb3a/raw/238f720ff059c1f82f368259d1ca4ffa5dd8f9f5/imagenet1000_clsidx_to_labels.txt
Resolving gist.githubusercontent.com (gist.githubusercontent.com)... 185.199.108.133, 185.199.109.133, 185.199.111.133, ...
Connecting to gist.githubusercontent.com (gist.githubusercontent.com)|185.199.108.133|:443... connected.
HTTP request sent, awaiting response... 200 OK
Length: 30564 (30K) [text/plain]
Saving to: ‘imagenet1000_clsidx_to_labels.txt’

imagenet1000_clsidx 100%[===================>]  29.85K  --.-KB/s    in 0.003s

2024-03-12 17:51:44 (9.38 MB/s) - ‘imagenet1000_clsidx_to_labels.txt’ saved [30564/30564]
[3]:
device = "cuda" if torch.cuda.is_available() else "cpu"
ivy.set_default_device("gpu:0" if torch.cuda.is_available() else "cpu")
Next, we load an image to be passed as the input for transpilation
[4]:
url = 'http://images.cocodataset.org/val2017/000000039769.jpg'
image = Image.open(requests.get(url, stream=True).raw)
[5]:
image
[5]:

We then initialise our ML model through the Keras API, specifically we’ll be using ConvNeXtXLarge. Note that while we are using a model from the Keras Model Hub for this demonstration, it would still work with any arbitrary TensorFlow model regardless of how it is being loaded. You can load models hosted on different platforms including local models.
[6]:
model = tf.keras.applications.ConvNeXtXLarge(
   model_name="convnext_xlarge",
   include_top=True,
   include_preprocessing=True,
   weights="imagenet",
   input_tensor=None,
   input_shape=None,
   pooling=None,
   classes=1000,
   classifier_activation="softmax",
)
2024-03-12 17:51:46.936026: I tensorflow/core/common_runtime/gpu/gpu_device.cc:1929] Created device /job:localhost/replica:0/task:0/device:GPU:0 with 14791 MB memory: -> device: 0, name: Tesla V100-PCIE-16GB, pci bus id: 0001:00:00.0, compute capability: 7.0
A note on the use of Ivy over Keras: You may be wondering why we can’t just use Keras with a PyTorch backend.
One of the reasons to highlight quickly is that when using Keras directly with a PyTorch model, we receive an instance of Functional while using ivy’s transpiler we get a torch.nn.Module which is much more compatible with the PyTorch ecosystem. There are more deeper reasons about what ivy offers over using keras directly, but to limit the scope of this demo, we will soon release a detailed comparison between Ivy and Keras in a separate blog post. Stay tuned!
We can then pass in the inputs to the original model
[7]:
inputs = tf.expand_dims(tf.convert_to_tensor(np.array(image)), axis=0)
inputs = tf.image.resize(inputs, (224, 224))
inputs = inputs.gpu() if len(tf.config.list_physical_devices('GPU')) else inputs
WARNING:tensorflow:From /tmp/ipykernel_65585/3221769294.py:3: _EagerTensorBase.gpu (from tensorflow.python.framework.ops) is deprecated and will be removed in a future version.
Instructions for updating:
Use tf.identity instead.
[8]:
logits = model(inputs)
logits_np = logits.numpy()
class_id = int(tf.argmax(logits, axis=-1)[0])
print(f"Predicted class : {idx2label[class_id - 1]}")
2024-03-12 17:51:57.342029: I external/local_tsl/tsl/platform/default/subprocess.cc:304] Start cannot spawn child process: No such file or directory
2024-03-12 17:51:57.906376: I external/local_xla/xla/stream_executor/cuda/cuda_dnn.cc:454] Loaded cuDNN version 8904
2024-03-12 17:51:57.993553: I external/local_tsl/tsl/platform/default/subprocess.cc:304] Start cannot spawn child process: No such file or directory
2024-03-12 17:51:58.578886: I external/local_xla/xla/service/service.cc:168] XLA service 0x558ecdd86830 initialized for platform CUDA (this does not guarantee that XLA will be used). Devices:
2024-03-12 17:51:58.578915: I external/local_xla/xla/service/service.cc:176]   StreamExecutor device (0): Tesla V100-PCIE-16GB, Compute Capability 7.0
WARNING: All log messages before absl::InitializeLog() is called are written to STDERR
I0000 00:00:1710255118.868823   65585 device_compiler.h:186] Compiled cluster using XLA!  This line is logged at most once for the lifetime of the process.
Predicted class : grey fox, gray fox, Urocyon cinereoargenteus
Converting the model from TensorFlow to PyTorch#
With the model loaded, we can run the transpilation to PyTorch eagerly. As we explain in our docs, eager transpilation involves manually providing dummy input arguments (tf.ones(1, 224, 224, 3) in our example) to use when tracing computational graphs.
[9]:
transpiled_model = ivy.transpile(
   model, source="tensorflow", to="torch", args=(inputs,), backend_compile=True
).cuda()
WARNING:root:Native Numpy does not support GPU placement, consider using Jax instead
The transpiled graph can be used with any deep learning framework as backend and, in this case, adding the to='torch' flag sets PyTorch as the backend framework to use, thereby effectively converting the original TensorFlow computational graph into a PyTorch graph!
Comparing the results#
Let’s now try predicting the class of the same input with the transpiled model
[10]:
logits_transpiled = transpiled_model(torch.tensor(inputs.numpy()).cuda())
logits_transpiled_np = logits_transpiled.detach().cpu().numpy()
class_id_transpiled = int(torch.argmax(logits_transpiled, axis=-1)[0])
print(f"Predicted class : {idx2label[class_id_transpiled - 1]}")
Predicted class : grey fox, gray fox, Urocyon cinereoargenteus
As you can see, the transpiled model predicted the same class as the input. But to compare the logits produced by the original and transpiled models at a more granular level, let’s try an allclose
[11]:
np.allclose(logits_np, logits_transpiled_np)
[11]:
True
The logits produced by the transpiled model at inference time are close to the ones produced by the original model, the logits are indeed consistent!
Fine-tuning the transpiled model#
One of the key benefits of using ivy’s transpiler is that the transpiled model is also trainable. As a result, we can also further train the transpiled model if required. Here’s an example of fine-tuning the transpiled model with a few images sampled from CIFAR-10 using PyTorch.
We start by importing the necessary libraries
[12]:
import torchvision
from torch import nn, optim
from torch.utils.data import DataLoader
import torchvision.transforms as T
We create the dataset, dataloader and optimizer
[13]:
transform = T.Compose(
    [
        T.Resize(224),
        T.ToTensor(),
        T.Normalize(
            mean=[0.5, 0.5, 0.5],
            std=[0.5, 0.5, 0.5],
        ),
    ]
)

cifar10 = torchvision.datasets.CIFAR10(root="./data", train=False, transform=transform, download=True)
cifar10.data = cifar10.data[:100]
dataloader = DataLoader(cifar10, batch_size=4, shuffle=True, drop_last=True, num_workers=2)
opt = optim.SGD(transpiled_model.parameters(), lr=1e-3)
loss_fn = nn.CrossEntropyLoss()
Files already downloaded and verified
We then set-up our training loop
[14]:
epochs = 5
loss_epoch_arr = []

for epoch in tqdm(range(epochs)):
    loss_arr = []
    for i, (image, label) in enumerate(dataloader):
        image, label = image.cuda(), label.cuda()
        image = torch.permute(image, (0, 2, 3, 1))
        probs = transpiled_model(image)
        loss = loss_fn(probs, label)
        loss.backward()
        opt.step()
        loss_arr.append(loss.cpu().item())
    avg_loss = sum(loss_arr) / len(loss_arr)
    loss_epoch_arr.append(avg_loss)
100%|██████████| 5/5 [02:04<00:00, 24.94s/it]
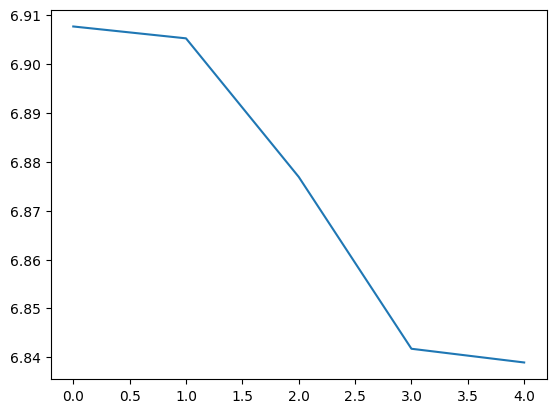
Here’s a graph of the average loss over the epochs we’ve trained the model
[15]:
import matplotlib.pyplot as plt
plt.plot(loss_epoch_arr)
plt.show()
And that’s it. we’ve successfully been able to train the transpiled model, we can now plug into any PyTorch workflow!
Conclusion#
We’ve just seen how the transpiler can be used to convert a model from TensorFlow to PyTorch and train the converted model in PyTorch.
Head over to the tutorials section in our documentation if you’d like to explore other demos like this. You can also run demos locally on your own machine by signing up to get a transpiler API key for local development.
If you have any questions or suggestions for other interesting demos you’d like to see, feel free to ask on our Discord community server, we look forward to seeing you there!